
Well-shaped eyebrows can change the overall appearance of your face without requiring a dramatic makeup routine. Brow mapping is a technique used to identify where the eyebrows should begin, where their highest point may sit, and where the tails should finish. Instead of removing hair according to guesswork, this method uses facial landmarks to create a more balanced guide for shaping.
Whether you prefer soft, natural brows or a more defined arch, brow mapping can help you understand your existing brow structure before reaching for tweezers, wax, or a brow pencil. It is commonly used by brow artists and beauty professionals, but the basic principles can also be useful at home. The key is to treat the measurements as a guide rather than a strict formula, because natural eyebrows and facial features differ from person to person.
What Is Brow Mapping Means and Why It Matters
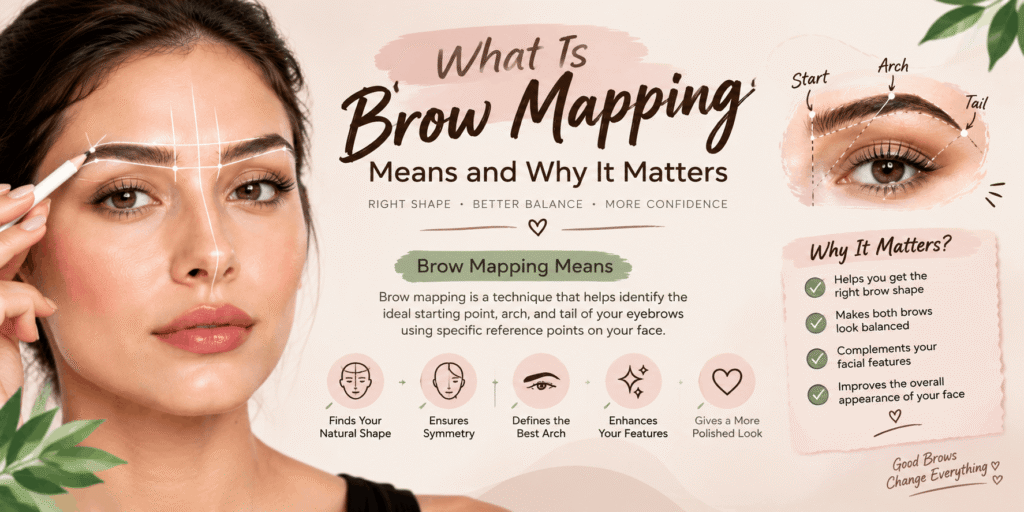
Brow mapping is a planning technique that helps establish a shape before eyebrow grooming begins. The process involves examining the relationship between the brows, eyes, nose, and other facial features, then marking reference points to guide trimming, tweezing, tinting, or makeup application.
Without a plan, it is easy to remove too much hair from the front of the brows, create an arch that looks unusually high, or shorten the tail. These small changes can affect the overall balance of the eyebrows. Mapping provides a visual reference, helping you make decisions gradually instead of removing hair wherever it appears unnecessary.
One of the main advantages of brow mapping is that it encourages you to work with your natural growth pattern. Not everyone has thick, symmetrical eyebrows, and the goal does not need to be making both sides look identical. A more practical aim is to create a shape that looks harmonious with your features while preserving as much natural hair as possible.
How Brow Mapping Differs From Ordinary Eyebrow Shaping
Traditional eyebrow shaping often focuses on removing unwanted hairs and cleaning up the outline. Brow mapping adds a planning stage before that work begins. Rather than immediately tweezing stray hairs, you first identify the intended beginning, arch, and endpoint of each brow.
This extra step can be particularly helpful if your eyebrows grow in different directions or have noticeably different shapes. One brow may naturally sit higher, while the other may have a fuller front or a shorter tail. A mapping guide helps you assess these differences before making changes.
It is also useful for people who regularly fill in their brows with makeup. Once you understand the shape that complements your face, it becomes easier to place pencil strokes, powder, or pomade more consistently. The result can look more intentional without requiring heavy product application.
The Three Main Points Used in Brow Mapping
Most basic brow mapping methods focus on three reference points: the beginning, the arch, and the tail. These points provide a simple framework for planning the outline. They are not universal measurements, however, and should be adjusted to accommodate natural brow growth and individual facial proportions.
Finding Where the Eyebrows Should Begin
The starting point establishes how far the front of each eyebrow extends toward the centre of the face. A common method uses the side of the nose as a reference. Hold a thin makeup brush or straight cosmetic pencil vertically beside the outer edge of the nostril and observe where the line meets the brow area.
This position can provide an initial guide, but it should not automatically determine how much hair to remove. The width of the nose, the distance between the eyes, and your natural brow density can all affect what looks balanced. If your brows naturally begin slightly closer together or farther apart, forcing them into a standard position may create an unnatural result.
When marking the starting point, use a light pencil stroke rather than drawing a thick line. Keep the front of the brow soft, especially if you prefer a natural finish. A heavily squared-off beginning can make the eyebrows look harsh even when the rest of the shape is well balanced.
Locating the Highest Point of the Brow
The arch is the area where the eyebrow reaches its highest position before descending toward the tail. A commonly used guide involves placing a straight tool from the side of the nose toward the outer edge of the iris while looking straight ahead. The point where the guide crosses the brow can help you estimate a possible arch position.
However, the natural brow bone and existing hair pattern should influence the final decision. Some people have a naturally noticeable arch, while others have relatively straight eyebrows. Creating a dramatic peak where little natural structure exists may require excessive hair removal and can make the result look disconnected from the face.
For a softer appearance, keep the arch relatively gradual and avoid creating a sharp corner unless that is the style you prefer. If you want more definition, you can emphasize the upper outline with makeup before committing to removing hair.
Deciding Where the Brow Tail Should End
The tail is the outer section of the eyebrow, extending beyond the arch toward the temple. One traditional mapping guide runs from the side of the nose toward the outer corner of the eye. The point where that line reaches the brow area can suggest a suitable endpoint.
Use this as a reference, not an absolute rule. Eye shape, brow length, and natural hair growth can change how an endpoint looks. A tail that finishes too early may make the eyebrow appear incomplete, while one that extends too far downward can create a drooping appearance that some people may not want.
Before removing hair, compare the proposed endpoint with the beginning and arch. The entire eyebrow should look connected rather than appearing as three separate sections. If your natural tail is sparse, a little pencil or powder may create a more balanced finish without requiring you to alter the surrounding hair.
How to Map Your Eyebrows at Home
You do not need a professional salon setup to understand the basic mapping process. A clean mirror, good lighting, a thin makeup brush or cosmetic pencil, and a brow pencil in a visible but removable shade are usually enough to begin. If you intend to groom your eyebrows afterward, keep clean tweezers and a spoolie nearby.
Start with clean, dry skin so that the markings remain visible. Brush your eyebrow hairs gently in their natural direction. This allows you to see where the hair grows densely, where small gaps appear, and how the existing outline relates to your facial features.
Next, identify the starting point, arch, and tail using the reference methods described above. Mark each location lightly on one brow before repeating the process on the other. Keep your face relaxed and look straight ahead while checking the positions. Raising your eyebrows or tilting your head can change how the shape appears.
Once the reference points are in place, connect them with faint lines to outline the upper and lower edges of each eyebrow. Avoid drawing a completely rigid shape around every hair. Your natural brow contains small variations, and a guide that is too narrow may encourage you to remove hair that contributes to a softer finish.
Check the Shape Before Removing Any Hair
Step back from the mirror and examine both eyebrows together. Look at the overall balance rather than concentrating only on individual hairs. Ask yourself whether the fronts appear appropriately spaced, whether the arches look comfortable with your natural brow bone, and whether the tails finish at a suitable length.
If something seems off, adjust the pencil marks first. It is much easier to erase a guide than to wait for removed eyebrow hair to grow back. You can also take a photograph with your face relaxed and facing forward, which may help you notice differences that are harder to assess when looking closely in a mirror.
Remember that natural eyebrows are rarely identical. Their growth patterns, heights, and densities may differ slightly. Brow mapping should help you make thoughtful choices about those differences, not encourage you to keep removing hair until both sides look perfectly matched.
Choosing a Brow Shape That Complements Your Features
Brow mapping is most useful when it supports your natural facial structure instead of forcing every eyebrow into the same fashionable outline. The same arch can appear soft on one person and overly dramatic on another, depending on the brow bone, eye placement, and natural hair distribution.
Soft, Straight Brows
A straighter brow generally has a gentle curve rather than a pronounced peak. This shape can be a good option for people who prefer an understated appearance or whose natural eyebrows already follow a relatively horizontal line.
During mapping, pay attention to the position of the arch and avoid lifting it too sharply simply because a tutorial recommends a high peak. A subtle transition toward the tail may create a more cohesive result. If your natural brows have a pronounced arch, you can soften its appearance with careful makeup rather than removing large amounts of hair from the upper edge.
Naturally Arched Brows
A natural arch follows the brow’s existing curve and creates a visible change in direction toward the tail. If your eyebrows already have this structure, mapping can help you preserve it while cleaning up the outline.
The important point is to avoid making the peak too narrow or removing too much hair beneath it. An arch can lose its softness if its upper and lower edges are shaped too aggressively. Following the existing hair pattern usually makes the finished brow easier to maintain.
Fuller, Fluffy Brows
Fuller eyebrows retain more of their natural density and may have hairs that extend slightly beyond the main outline. Brow mapping can still be helpful for this style, but the guide should allow for the natural texture rather than forcing every hair into a sharply defined border.
Brush the hairs upward and outward to understand their length and direction. Mark only the areas that genuinely need attention. You may discover that a small amount of trimming or minimal cleanup is enough to create a neater appearance without sacrificing fullness.
Brows With a High or Low Natural Arch
If your natural arch sits relatively high, you may not need to remove much hair to make it noticeable. Focus on maintaining a balanced transition from the front to the tail. Removing too much hair from beneath a high arch can make it appear even more pronounced.
For brows with a lower or subtler arch, avoid trying to manufacture a steep curve through extensive tweezing. A softer outline may work better with the existing structure. Makeup can provide a little extra lift or definition when desired, allowing you to experiment without making a permanent change to the shape.
The most useful shape is the one that works with your natural features and personal style. Mapping should make those choices clearer, not turn eyebrow grooming into a search for one supposedly perfect design.
Preparing Your Brows Before You Start Mapping
A good brow shape begins with understanding what you already have. Before making any marks, take a close look at your eyebrows without makeup covering the natural outline. You may notice that one side has a fuller front, one tail grows slightly lower, or a few hairs create the impression of an uneven arch. Recognising these details helps you make more thoughtful decisions instead of removing hair simply because it falls outside an imagined perfect line.
Begin by cleansing the brow area gently and removing any leftover brow gel, pencil, or skincare residue. Allow the skin to dry completely so that your guide marks remain visible. Brush the hairs with a clean spoolie, following their natural growth direction. This simple step can reveal the true outline of your eyebrows and show where extra length or stray hairs might need attention.
Choose a mirror that allows you to see both eyebrows at once. Bright, even lighting is useful because shadows can make one brow appear fuller or darker than the other. Keep your head straight, relax your forehead, and look forward rather than raising your eyebrows while examining their shape.
Brow Mapping for Different Eyebrow Concerns
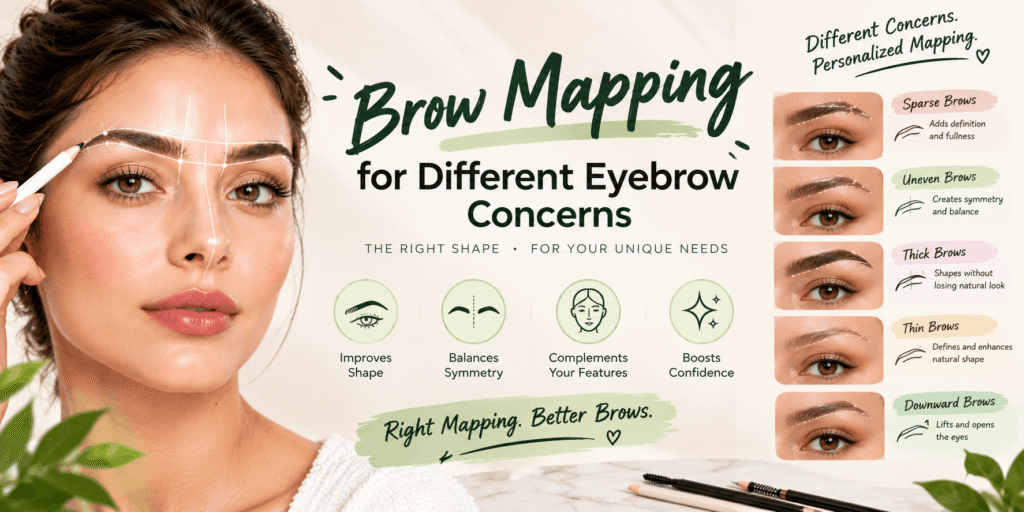
Not every person starts with full, evenly distributed eyebrow hair. Some have gaps, short tails, uneven growth, or brows that have been overplucked in the past. The mapping approach should account for these differences instead of treating every eyebrow as if it has the same starting shape.
When One Eyebrow Sits Higher Than the Other
Slight differences in eyebrow height are common. One brow may naturally lift more when you speak, while the other stays relatively flat. Trying to make both sides perfectly identical can lead to unnecessary grooming and a shape that looks unnatural when your face moves.
Map each eyebrow according to its own natural structure, then compare the overall appearance with your face relaxed. You can use makeup to create a closer visual balance by adjusting the upper outline or filling a small gap. Avoid removing large amounts of hair from the fuller brow simply to match the less full one.
Remember that eyebrows are part of an expressive face. A little variation can look entirely natural, and the objective is a harmonious appearance rather than mathematical symmetry.
When Your Brows Have Sparse Areas
Gaps can appear because of natural growth patterns, previous overplucking, or differences in hair density. Brow mapping can help you identify where the shape should visually continue, even when there is not enough hair to create a complete outline.
Instead of narrowing the brow to fit only the existing hairs, lightly mark the shape you would like to create with makeup. Use a fine pencil to add small strokes that resemble individual hairs, particularly around sparse fronts and tails. A powder product can soften the overall appearance, while a clear or tinted brow gel can help direct the hairs you already have.
Do not remove healthy hairs simply because they sit outside a narrow outline drawn around the sparse section. Preserving natural density gives you more options for future shaping and makeup.
When Your Eyebrows Are Naturally Thick
Thick eyebrows may have a strong outline already, so extensive mapping and hair removal may not be necessary. Your main goal may be to tidy the edges and create a more intentional shape while retaining the fullness that makes the brows distinctive.
Brush the hair upward to see which strands extend beyond the general upper outline. Then brush it sideways to understand how the length affects the tail. Mark only the areas that genuinely need attention and avoid creating a thin, sharply defined border unless that is your preferred look.
For a softer finish, remove only a few obvious stray hairs at a time. Step back from the mirror between adjustments because working too close can make small imperfections appear more significant than they are.
When Your Brows Are Short or Have Downward Tails
A short tail can make an eyebrow appear incomplete, while a tail that angles downward may create a different visual effect from the one you want. Mapping allows you to explore a possible endpoint before making changes.
Use a light makeup pencil to sketch a tentative extension toward the outer brow area. Compare the proposed length with the rest of the eyebrow and your eye shape. If the tail needs extra definition, filling it with small pencil strokes may be enough. There is no need to remove existing hair merely to make room for a longer outline.
If your natural tail slopes downward, avoid automatically raising it through aggressive tweezing. Experiment with a slightly lifted makeup outline first and see whether it suits your features.
How Professionals Use Brow Mapping
Professional brow artists often use mapping to establish a clear plan before services such as shaping, tinting, or other brow treatments. The exact approach can vary according to the artist’s training, the client’s preferences, and the service being performed. Some use a thread coated with cosmetic marking pigment, while others work with a brow pencil, measuring tool, or a combination of methods.
A professional generally considers more than three isolated points. The width of the brow, its upper and lower boundaries, the natural direction of growth, and the client’s desired result all influence the proposed shape. The artist may also assess how the eyebrows look when the client is sitting upright and making normal facial expressions.
This consultation is important because a shape that looks attractive on a reference photograph may not translate directly to another person’s face. Brow density, skin characteristics, natural asymmetry, and maintenance preferences can all affect the final plan.
What Happens During a Mapping Appointment?
An appointment often begins with a discussion about the desired look. You might prefer a fluffy, natural brow, a defined arch, or a clean outline that works well with daily makeup. Sharing your preferences before shaping begins gives the professional a clearer idea of the result you expect.
The artist then examines the existing eyebrows and marks the proposed shape. You may be asked to look straight ahead while the reference points and connecting lines are checked. Before hair is removed, you should have an opportunity to see the outline and discuss any concerns.
If the proposed shape looks too thin, too angular, or too long, mention it before the service continues. Brow mapping is intended to support a shared plan, so it is reasonable to ask for adjustments. A professional should explain what is achievable with your current hair growth rather than promising that every eyebrow can be transformed into an identical shape.
Using Brow Mapping With Makeup and Brow Treatments
Mapping is not limited to tweezing. It can also help organise makeup application, particularly when you want the brows to look consistent from day to day. Once you have a guide that works for your features, you can use it to position pencil strokes, powder, gel, or other brow products more deliberately.
Creating a Guide for Everyday Brow Makeup
Start by brushing your eyebrow hairs into place. Using a fine brow pencil, make light marks at the front, arch, and tail. These references can help you maintain the intended length and direction without drawing a heavy outline around the entire brow.
Fill sparse areas with short strokes that follow the natural direction of growth. Keep the front lighter than the body of the brow if you prefer a soft gradient, then add a little more definition toward the arch and tail where needed. Blend any visible pencil edges with a spoolie so that the product integrates with the natural hairs.
If the two eyebrows differ slightly, adjust the makeup rather than repeatedly reshaping them. You may need a few extra strokes on one tail or less product at the front of the other. Small, targeted changes often look more natural than trying to make both brows identical.
Brow Mapping Before Tinting
Mapping can be particularly useful before a brow tint because the outline helps establish where the colour should be concentrated. It allows the artist to plan the visible shape and discuss whether the desired result is subtle or more defined.
However, tinting products should be used only according to their intended purpose and manufacturer instructions. Products designed for hair on the scalp are not automatically suitable for the eyebrow area, especially near the eyes. If you are receiving a professional tint, ask which product is being used and follow the recommended precautions.
A mapped outline does not guarantee that every hair will take colour in exactly the same way. Existing hair density, skin preparation, and the specific formula can affect the appearance. A cautious approach and realistic expectations are important.
Brow Mapping Before Lamination
Brow lamination changes the way eyebrow hairs lie by directing them into a more uniform or lifted arrangement. Mapping before the treatment can help establish the outline that the artist wants to preserve once the hairs are styled.
The intended shape should still respect your natural growth pattern. Brushing every hair straight upward may not suit every brow, and an overly dramatic direction can make the result look stiff. Discuss whether you want a softly lifted effect or a more structured finish before the treatment begins.
Lamination involves chemical products, so follow the professional’s safety instructions and avoid using them on irritated or damaged skin. Mapping helps with shape planning, but it does not replace appropriate product handling or aftercare.
Mistakes That Can Ruin an Otherwise Good Brow Shape
One of the biggest problems is removing too much hair during the first session. A few individual hairs may seem unimportant when viewed close to the mirror, but removing several rows can quickly change the width and direction of the eyebrow. Work gradually and reassess the entire shape after every small adjustment.
Another mistake is making the front of the eyebrow too square. A sharply outlined beginning can look heavy, especially when the rest of the brow is soft. If you prefer a defined makeup style, you can still create a neat front without filling it with the same intensity as the arch and tail.
Drawing the arch too high is another common issue. It may create a dramatic curve that does not follow the natural brow bone. Before changing the shape, use makeup to test a slightly higher or lower arch and examine the result from a normal viewing distance.
Poor lighting can also affect decisions. Warm indoor bulbs may make small hairs difficult to see, while strong shadows can distort the apparent outline. Use even lighting and look at both eyebrows together before deciding that an area needs correction.
Finally, avoid chasing perfection by repeatedly adjusting one side. The more you remove, the fewer options you have for restoring the original shape quickly. If you are uncertain, leave the remaining hairs in place and reassess the outline another day.
Brow Mapping Aftercare and Maintenance
After shaping, the skin around your eyebrows may feel temporarily sensitive, especially if tweezing, waxing, or threading has been involved. Avoid rubbing the area and keep your hands clean. If the skin is irritated, pause unnecessary makeup application and follow suitable aftercare advice from the professional who performed the service.
For the next day or so, be cautious with products that may sting freshly groomed skin, including strong exfoliating acids or retinoid products near the treated area. The appropriate recovery period depends on the method used and your skin’s response. If you experience significant swelling, worsening pain, blistering, or a reaction near the eyes, seek medical advice rather than trying to cover the problem with makeup.
Maintenance needs vary according to hair growth and the shape you prefer. Some people only need occasional cleanup, while others prefer regular professional appointments. Avoid scheduling grooming so frequently that you remove new growth before you can assess the overall outline.
If your goal is to grow out brows that have become too thin, give the hair time to return where possible. Growth rates vary, and not every area will fill in at the same speed. During this period, a pencil or powder can help you create a temporary outline without removing more hair.
Final Thoughts
Brow mapping provides a thoughtful way to plan eyebrow shaping instead of relying on guesswork. By identifying useful reference points and considering natural hair growth, you can make more deliberate choices about brow length, arch, and overall definition.
The most successful result does not have to be perfectly symmetrical or follow a particular trend. It should work with your facial features, feel comfortable to maintain, and suit the look you want to achieve. Start with light markings, make changes gradually, and preserve natural hair whenever possible.
Whether you use mapping before tweezing, as a guide for everyday makeup, or when visiting a brow professional, the technique can make the process easier to understand. Give yourself time to assess the outline before committing to changes, and remember that a balanced, natural-looking brow often begins with doing less rather than removing more.
Yes. The basic technique can be learned at home using a mirror, a thin cosmetic pencil, and a spoolie. Start by identifying the beginning, arch, and tail, then draw a light guide and assess it before removing hair. If you are uncertain about the shape, using makeup to test the outline first is a low-commitment option.
A simple at-home mapping session may take only a few minutes once you understand the process. More time may be needed when your brows have uneven growth or you are planning a major change. Professional appointments vary depending on whether mapping is performed alone or alongside shaping, tinting, or another service.
No. It helps you plan a balanced shape, but natural facial asymmetry and differences in hair growth remain. Trying to create perfectly identical brows can lead to excessive removal. A shape that looks harmonious across the face is generally a more practical goal than exact symmetry.





2 Comments