
Glute bridges are one of those exercises that look almost too simple to be useful. You lie down, bend your knees, lift your hips, and lower them again. But when the movement is performed with controlled technique, it can become a valuable part of a lower-body workout, especially when you want an exercise that requires little or no equipment.
The interesting part is that the quality of each repetition matters much more than simply doing a large number of them. Your foot position, hip movement, core control, and the way you finish each repetition can all change how the exercise feels.
Whether you’re completely new to lower-body training or simply looking for another movement to add to your routine, learning the mechanics first can make glute bridges much more effective and comfortable.
The Setup Most People Get Slightly Wrong
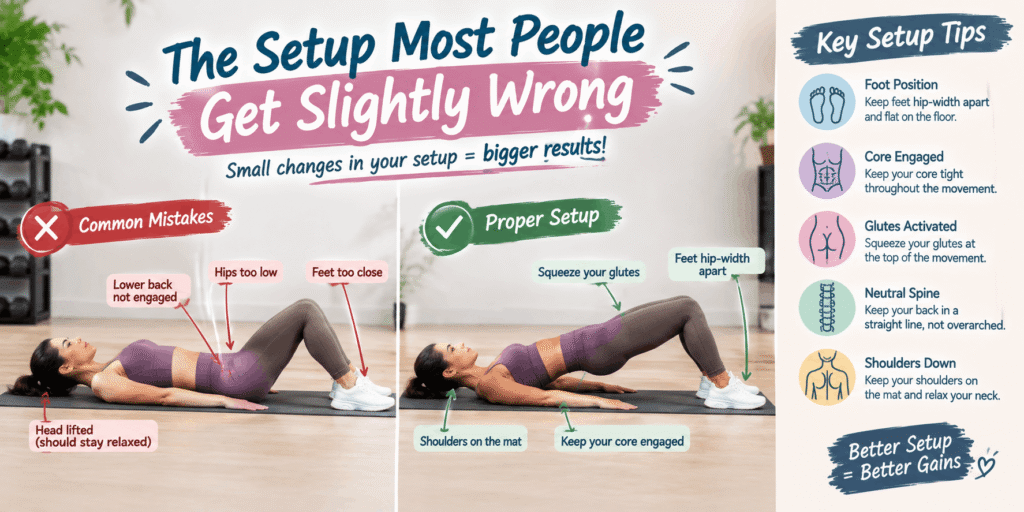
Before worrying about repetitions or adding resistance, get your starting position right. Glute bridges begin with a simple setup: lie on your back on a comfortable, stable surface with your knees bent and your feet resting on the floor. Keep your arms relaxed beside your body.
Your feet should be positioned so that you can lift your hips without having to dramatically shift your body forward or backward. There isn’t one perfect measurement that works for everyone because leg length and body proportions differ. A comfortable starting position is more useful than forcing your feet into an exact spot.
Your upper back and shoulders should remain supported by the floor while your hips move upward. Keep your head and neck relaxed rather than trying to lift your head to watch your legs. With glute bridges, a stable starting position makes it easier to focus on controlled movement rather than simply getting through each repetition.
Where Your Feet Should Actually Go
Foot placement can make a noticeable difference in how a glute bridge feels. If your feet are positioned too far away, you may feel more work around the back of your thighs. If they’re extremely close to your body, the movement can feel different again and may be less comfortable.
Start with your feet roughly under your knees or at a position that allows your shins to become fairly upright near the top of the movement. Then make small adjustments based on your proportions and comfort.
Your feet should remain stable throughout the repetition. Avoid letting your heels lift repeatedly or allowing your knees to collapse inward.
The Position of Your Ribs, Pelvis, and Spine
A common mistake is trying to create as much height as possible by arching the lower back. That isn’t the goal of the exercise.
Instead, think about moving your hips upward while keeping your torso controlled. Your ribs shouldn’t dramatically flare upward as your hips rise. Keeping your trunk steady helps make the movement come from the hips rather than turning it into an exaggerated lower-back motion.
You don’t need to force your back completely flat against the floor. Focus on maintaining a comfortable, controlled position throughout the repetition.
Make Every Rep Count With These Small Adjustments
Once the starting position feels comfortable, the next step is controlling the actual movement. Push through your feet and raise your hips in a smooth motion. At the top, your body should form a generally straight line from your shoulders toward your knees without forcing the hips excessively high.
Then lower yourself under control rather than immediately dropping back to the floor.
The exercise can look simple when performed quickly, but rushing through repetitions makes it harder to maintain consistent technique. A slower movement gives you more opportunity to notice whether your hips, knees, and feet are staying in a stable position.
The Difference Between Lifting High and Lifting Well
Higher isn’t automatically better.
If you keep pushing your hips upward after reaching a comfortable top position, you may compensate by excessively extending your lower back. Instead of chasing maximum height, concentrate on finishing the movement with control.
At the top, briefly tighten the muscles around your hips and then return to the starting position. The goal is a smooth range of motion rather than trying to create the biggest possible arch.
This small change can make your repetitions feel much more deliberate.
Where You Should Feel the Movement
You should generally feel the movement around the muscles of your hips and buttocks, although other muscles—including the hamstrings and core—also contribute.
If you’re mostly feeling your lower back, first check your positioning. You may be lifting too high, losing control of your trunk, or trying to force a range of motion that isn’t comfortable for you.
If your hamstrings dominate the movement, experiment with a small change in foot position. Don’t completely overhaul your technique after one repetition; make one adjustment at a time and see how the movement changes.
The Pause That Changes the Exercise
A short pause at the top can make a basic repetition more challenging without requiring additional equipment.
Instead of immediately lowering your hips after reaching the top, hold the position briefly while maintaining control. Then lower slowly and begin the next repetition.
This removes some of the momentum that can sneak into faster repetitions. It also encourages you to stay aware of your position rather than simply counting repetitions.
7 Glute Bridge Variations Worth Adding to Your Routine
Once you’ve become comfortable with the basic movement, variations can give the exercise a different challenge. You don’t need to perform every version in one workout. Choosing one or two that match your current ability is usually enough.
1. Basic Glute Bridge
The standard version is the foundation for everything else. With your back supported, knees bent, and feet planted, raise your hips smoothly and return them to the floor with control.
This version is useful for learning the movement pattern before introducing additional resistance or balance demands.
Instead of immediately chasing a high repetition count, focus on making each repetition look similar to the one before it.
2. Paused Glute Bridge
This variation uses the same basic setup but adds a deliberate pause at the top.
Lift your hips, hold the top position briefly, and then lower under control. The pause encourages you to avoid bouncing through the movement and can make a familiar exercise feel considerably more demanding.
It’s particularly useful when ordinary repetitions have started feeling too easy but you’re not ready to add external resistance.
3. Marching Glute Bridge
A marching variation introduces an additional balance challenge. Start in the regular bridge position and establish a stable hip position before carefully lifting one foot at a time.
The goal isn’t to swing the legs upward. Instead, keep your hips as steady as possible while one foot briefly leaves the floor.
Because this variation demands more control, quality matters more than speed. If your hips rotate or drop significantly, return to the basic version and build more control first.
4. Single-Leg Glute Bridge
The single-leg version increases the challenge by asking one side of the body to do more of the work.
Begin with both feet supported and establish a comfortable bridge position. Then extend one leg while maintaining control before performing the movement with the other leg.
This isn’t a variation you need to rush into. If keeping your hips level is difficult, the standard bridge is still useful for developing the necessary movement control.
5. Banded Glute Bridge
A resistance band can add another challenge while keeping the exercise relatively simple.
Depending on the band and its placement, the movement can also encourage you to pay closer attention to keeping your knees aligned instead of allowing them to collapse inward.
Start with manageable resistance. The goal is still controlled movement, not making the exercise difficult simply for the sake of using a stronger band.
6. Feet-Elevated Glute Bridge
For this variation, your feet are supported on a stable elevated surface. The change in foot position alters the movement and can increase the challenge.
Because elevation introduces another stability consideration, use a surface that is secure and appropriate for exercise. Don’t use an unstable object simply to make the movement harder.
7. Weighted Glute Bridge
Once the basic bodyweight movement feels comfortable, external resistance can provide another progression.
A suitable weight can be positioned across the hips with appropriate care and control. Start conservatively rather than immediately choosing a heavy load.
The added resistance should still allow you to maintain a controlled range of motion and consistent technique. If the weight causes you to lose positioning, reduce the resistance and rebuild your form.
When Glute Bridges Stop Feeling Effective
A movement can become familiar without becoming useless. If glute bridges no longer feel challenging, the answer isn’t always to perform hundreds of repetitions. Sometimes the bigger issue is that your technique has become automatic and you’re moving through each rep without enough control.
Before adding more resistance, look at how you’re performing the exercise. Are you lowering your hips slowly? Are your feet staying planted? Are your knees remaining stable? Are you pausing at the top, or are you immediately bouncing into the next repetition?
These details can make a surprisingly large difference.
You’re Rushing the Repetitions
Speed can make an easy exercise feel even easier. When you quickly lift and drop your hips, momentum starts doing some of the work.
Try giving each repetition its own rhythm. Raise your hips smoothly, briefly control the top position, and lower yourself without simply collapsing onto the floor.
You don’t have to make every repetition extremely slow. The important thing is that you’re controlling the movement rather than racing through it.
Your Lower Back Is Taking Over
If your lower back consistently feels like it’s doing most of the work, reconsider how you’re finishing each repetition.
Instead of trying to lift your hips as high as physically possible, stop at a comfortable top position. Keep your torso controlled and avoid exaggerating the arch in your back.
A smaller, well-controlled movement can be more useful than a dramatic lift that changes the mechanics of the exercise.
You’re Adding Resistance Too Soon
Adding weight can make an exercise more difficult, but it shouldn’t be the first solution to every plateau.
If you can’t maintain stable positioning with your own body weight, increasing resistance may simply make the same technique problems harder to control. Build consistency first, then gradually increase the challenge when your form remains reliable.
Build a Better Routine Around the Movement
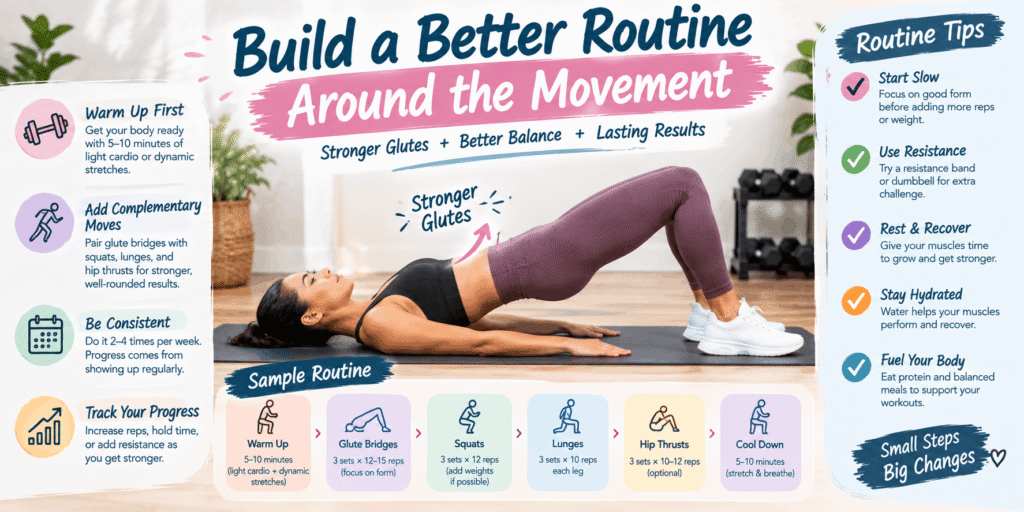
Glute bridges can work as part of a warm-up, a lower-body workout, or a short home session. The best approach depends on your current training experience and what else you’re doing during the workout.
You don’t need a complicated routine built around dozens of exercises. A few controlled movements that target different aspects of lower-body strength can create a more balanced session.
For Beginners
If you’re new to exercise, start with the basic version and focus on learning the movement.
A simple session might include a few controlled sets of bodyweight glute bridges along with other beginner-friendly lower-body movements. Leave enough recovery between sessions rather than assuming you need to train the same muscles intensely every day.
The exact number of repetitions isn’t universal. Choose a manageable amount that allows you to maintain consistent technique from the beginning to the end of the set.
For a Strength-Focused Session
As you become more comfortable, you can gradually introduce resistance or more challenging variations.
For example, you might use the basic bridge early in a session and then move toward a resistance-based variation. The important part is progression: increase the challenge gradually instead of making a huge jump from an easy bodyweight movement to a difficult weighted version.
You can also vary the difficulty by changing the movement rather than simply adding weight. Single-leg and marching variations introduce additional control requirements without relying entirely on heavier resistance.
For a Short At-Home Workout
One of the biggest advantages of glute bridges is that they don’t require a gym to perform the basic version.
For a short home session, combine them with other movements that involve your legs, hips, and core. You can perform a few sets of standard bridges, follow them with a different lower-body exercise, and finish with a controlled variation.
A short workout doesn’t have to mean an exhausting workout. Consistency and appropriate progression matter more than making every session extremely difficult.
How to Keep Progressing Without Making It Complicated
Progress doesn’t always mean adding more weight. You can make an exercise more demanding by improving your control, increasing the challenge of the variation, adding a brief pause, or gradually increasing the amount of work you can perform with good technique.
For example, someone who has mastered the basic bridge might first introduce a pause at the top. Later, they could experiment with a band or a single-leg variation. Eventually, a suitable external load may become another option.
This approach gives you several ways to progress without constantly chasing bigger numbers.
It’s also useful to keep track of how an exercise feels rather than focusing exclusively on repetition counts. If you can perform the same number of repetitions with better control and less unnecessary movement, that’s still meaningful progress.
And if a particular variation causes pain rather than ordinary exercise effort, don’t simply push through it. Stop and reassess your technique or seek appropriate professional guidance.
Final Thoughts
Glute bridges prove that an exercise doesn’t need complicated equipment or a long list of steps to earn a place in a workout. Their simplicity is actually one of their biggest advantages, especially when you’re training at home or learning the basics of lower-body movement.
The key is to stop judging the exercise only by how many repetitions you can complete. Foot placement, controlled hip movement, stable knees, and a deliberate finish can completely change the quality of a set.
Once the basic version becomes comfortable, you have plenty of ways to progress. Pauses, bands, single-leg variations, elevated positions, and appropriate resistance can all give the movement a new challenge.
Most importantly, progression should be gradual. Build control first, increase difficulty when you’re ready, and pay attention to how your body responds. With consistent practice and sensible technique, this simple movement can remain useful long after the beginner stage.