
A sun-kissed look does not have to involve hours outdoors or exposure to ultraviolet rays. Self tanning mousse offers another way to add temporary color to your skin, making it possible to create anything from a subtle golden glow to a deeper bronze finish at home. The key is understanding how the product develops, how your skin affects the final shade, and why the application process matters just as much as the formula itself.
Unlike makeup bronzer, which sits on the surface and washes away, most self-tanning mousses use dihydroxyacetone (DHA) to react with amino acids in the outermost layer of the skin. This creates a temporary brown appearance that gradually fades as those skin cells shed. The result is not a real tan caused by increased melanin production, and it does not protect your skin from the sun.
Choosing the right mousse and applying it with care can help you avoid common problems such as streaks, dark elbows, orange-looking patches, and uneven fading. You do not need an elaborate routine, but a little preparation can make a noticeable difference.
What Makes Self Tanning Mousse Different?
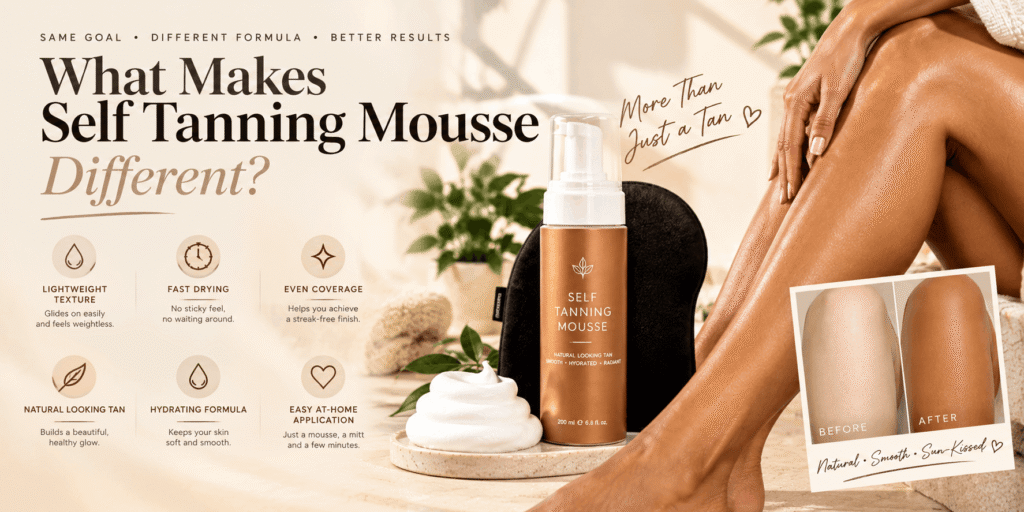
Self tanning mousse has a lightweight, airy texture that spreads across the skin and is often easy to distribute with a tanning mitt. Compared with some thicker creams or lotions, a mousse may feel less heavy during application and can be convenient when covering larger areas such as the legs, arms, and torso.
However, texture alone does not determine how natural your tan will look. The formula, DHA concentration, guide color, skin condition, and application technique all influence the result. Two products with similar textures can develop into noticeably different shades.
Some mousses include a temporary guide color. This tint helps you see where the product has been applied, which can be useful when working around the knees or ankles. It is not necessarily the final tan, and some guide colors transfer to clothing or bedding before being washed off according to the product instructions.
Other formulas have little or no visible guide tint. These can be appealing if you want to avoid transfer from a cosmetic bronzer, but they require careful application because missed areas may be harder to spot immediately.
How the Color Develops
Most self-tanning mousses rely on DHA, an ingredient that reacts with components in the outer layer of the skin. The resulting color develops over several hours rather than appearing entirely at the moment of application.
This explains why your skin may look only slightly different at first, then become more noticeably bronzed later. Washing too early can interfere with the intended development process, so follow the timing provided with your specific product.
The developed color is temporary. As the outer skin cells naturally shed, the tan gradually becomes lighter. It does not permanently change your skin tone, and it cannot reproduce every detail of a natural tan caused by sun exposure.
The final shade also depends on your starting skin tone. A formula that creates a warm bronze finish on one person may appear deeper or more golden on someone else. For this reason, choosing a product based on its advertised color alone can lead to disappointment.
Choosing Between Light, Medium, and Dark
Self-tanning products often use shade labels to help customers estimate the depth of the result. These labels are not standardized across brands, so medium in one range may look different from medium in another.
A light shade may suit someone who wants a gentle change rather than a dramatic difference. It can also be a sensible starting point if you have never used self-tanner and are unsure how your skin will respond.
A medium shade may provide a more visible bronze effect while still allowing a gradual-looking result when applied evenly. It can be useful when you want your arms and legs to look more defined without creating a sharp contrast with your face or neck.
A dark shade is intended to produce a deeper-looking finish, but it is not automatically the best choice for a more natural appearance. Applying a highly concentrated formula too heavily can exaggerate dry patches and make uneven areas more noticeable.
Think about the result you want in ordinary lighting, not only how the shade looks in a product photograph. If you are uncertain, choose a formula that gives you room to build the color gradually rather than trying to achieve your deepest possible tan in one application.
Preparing Your Skin Before Application
Preparation is where many successful self-tanning routines begin. The aim is not to make your skin perfectly smooth or remove every trace of texture. It is to create a reasonably even surface so that the product has a better chance of developing consistently.
Start by considering your schedule. If you plan to shave or remove body hair, do so ahead of the tanning session rather than immediately before applying the mousse. Hair removal can leave the skin temporarily sensitive, and freshly shaved areas may react differently to products.
Exfoliation may help remove loose dead skin cells, especially around rough areas such as the knees, elbows, ankles, and heels. Use a gentle method rather than scrubbing aggressively. Over-exfoliation can irritate the skin, making tanning more uncomfortable and potentially less even.
If your skin is already red, cracked, sunburned, or irritated, postpone tanning until it has recovered. Self-tanner is a cosmetic product, not a treatment for damaged skin.
After showering, allow your skin to dry completely. Applying mousse to damp skin can make it harder to distribute the formula evenly. Pay attention to areas where water tends to remain, including behind the knees and around the ankles.
Give Dry Areas Special Attention
Dry skin can absorb or hold color differently from surrounding areas, creating patches that look darker than expected. This is particularly common around elbows, knees, ankles, hands, and feet.
If these areas feel rough, use a gentle moisturizer as part of your regular skincare routine before tanning day. Just before application, follow the mousse manufacturer’s guidance about moisturizing. Some routines recommend a small amount of moisturizer on particularly dry areas, while others advise applying the product to clean, dry skin.
Avoid coating the entire body in a heavy, greasy cream immediately before tanning unless the product instructions specifically allow it. A thick layer may interfere with how evenly the mousse spreads.
The goal is to prevent dry areas from standing out, not to make the skin slippery. A light touch is often enough around the roughest spots.
How to Apply Self Tanning Mousse for an Even Finish
Once your skin is prepared, work in a well-lit room where you can comfortably reach all the areas you intend to tan. A tanning mitt can help distribute the product more evenly and reduce the chance of staining your palms.
Dispense a manageable amount of mousse onto the mitt, then spread it over one section at a time. Long, controlled movements can help cover larger areas, while smaller circular movements may make it easier to blend around curves and joints. Avoid repeatedly adding more product to a section that already looks covered.
Start with areas that are easy to reach, such as the legs, then move to the torso and arms. Work methodically so that you do not accidentally skip a strip of skin. The exact order is less important than maintaining a consistent approach.
Use less product around joints and areas where skin folds. Knees and elbows naturally have more texture, so applying the same heavy amount used on the thighs or upper arms can produce a darker result.
A More Careful Approach to Hands, Feet, and Ankles
Hands and feet often reveal uneven self-tanning because they have creases, dry areas, and changes in skin thickness. They also tend to look unnatural when coated as heavily as the larger parts of the body.
After finishing your arms, use the remaining small amount of product on the mitt rather than dispensing a fresh, full pump for your hands. Blend lightly over the backs of the hands, paying attention to the spaces between the fingers. Avoid leaving a thick layer in the creases or around the nails.
For feet, apply sparingly and blend toward the ankles. Take care around the toes, heels, and the sides of the feet, where excess product can collect. If these areas are particularly dry, they may need more preparation rather than more mousse.
Wash your hands thoroughly if you have applied product without a mitt, following the manufacturer’s instructions. Pay attention to the palms, fingers, and around the nails because these areas can develop unwanted color quickly.
If your formula includes a guide tint, check your hands and feet before finishing. A quick inspection in natural or bright neutral lighting can help you spot obvious streaks while you still have time to follow the product’s correction instructions.
What About the Face?
Body mousse is not automatically suitable for facial use. Some formulas are designed for both the face and body, while others are intended for body application only. Check the label before using the product on your face.
If the manufacturer permits facial use, apply a small amount carefully and blend around the hairline and jaw so that the color transitions naturally. Avoid the eyes, lips, nostrils, and any irritated areas.
Your face may develop color differently from your body because of differences in oil production, skincare products, and cleansing habits. If you use exfoliating acids, retinoids, acne treatments, or other active skincare ingredients, check whether the combination is appropriate and avoid applying self-tanner to irritated skin.
You may prefer a separate facial tanning product if you want more control over the shade or texture. A lighter application around the face can also help prevent an obvious contrast between your face, neck, and chest.
When to Shower and What to Expect Afterward

The correct waiting period depends on the formula. Some self-tanning mousses are designed to be rinsed after a specified development window, while others may have different application and wear instructions. Follow the label rather than assuming every mousse works in the same way.
If the product includes a guide color, the first rinse may remove some of the temporary tint. This does not necessarily mean the developed tan has disappeared. The DHA-related color continues to become visible according to the product’s development process.
During the waiting period, avoid activities that cause excessive sweating or friction if the manufacturer advises against them. Tight clothing may rub against the product before it has set, potentially creating uneven areas. Loose, comfortable clothing can be a practical choice.
After the recommended rinse, gently pat your skin dry instead of rubbing it vigorously with a towel. If the product allows moisturizing after development, use a simple moisturizer that your skin tolerates well.
Do not panic if the first few hours look different from the result you expected. The guide tint, the early color, and the fully developed shade are not always identical. Give the product the time specified on the label before deciding whether the color is too light or too dark.
Keeping Your Tan Looking Even as It Fades
A self-tan does not fade like a switch being turned off. Some areas may lose color sooner than others because of friction, washing, dryness, and the natural shedding of skin cells.
Regular moisturizing can help reduce the appearance of dry, flaky patches as the color fades. Choose a product that suits your skin and apply it as part of your normal routine, provided your self-tanner’s instructions do not recommend otherwise.
Be gentle when washing. Very hot water, vigorous scrubbing, and frequent exfoliation may cause the color to fade more quickly or unevenly. You do not need to avoid normal bathing, but a gentle approach can help the finish look more consistent.
Areas such as the hands, feet, knees, and elbows may fade differently from the rest of the body. If the color becomes patchy, avoid repeatedly layering more mousse over visibly uneven skin. That can deepen some areas without correcting the underlying problem.
Instead, follow the manufacturer’s advice for removing or correcting an old tan. Once the previous color has faded sufficiently and your skin is comfortable, you can prepare for another application.
How Often Should You Reapply?
There is no universal reapplication schedule that works for every person or product. Some people prefer a single application for a particular occasion, while others maintain a more regular routine.
Consider the condition of your skin and the appearance of the existing color before applying more. If your tan is fading evenly, you may choose to wait. If it has become patchy, correcting or removing the remaining color first may produce a better result than adding another layer.
Repeated application does not guarantee a more natural finish. Building too much color too quickly can make the shade darker than intended, particularly around dry or textured areas.
Follow the product instructions, and give your skin a break if it becomes irritated. If you experience persistent redness, burning, itching, or swelling, stop using the product and seek medical advice when appropriate.
Common Self Tanning Mousse Mistakes to Avoid
Small application errors can have a bigger effect on the final result than the product’s price or popularity. A few practical adjustments can help prevent the most common problems.
Applying too much at once: A generous layer may seem like a shortcut to a deeper tan, but excess product can collect around joints and dry patches. Work in manageable sections and follow the recommended amount.
Ignoring the skin’s texture: Rough elbows, knees, and ankles may develop more visible color. Prepare these areas gently and use a lighter application rather than covering them with extra mousse.
Choosing a shade based only on the packaging: Product photographs, guide colors, and shade names can be misleading. Your natural skin tone and the formula’s strength influence the result.
Getting dressed before the product has set: Clothing can rub against freshly applied mousse, affecting the finish and potentially picking up color. Follow the recommended drying time and wear loose clothing when appropriate.
Expecting self-tanner to protect against sunlight: A cosmetic tan does not provide reliable sun protection. Continue using broad-spectrum sunscreen with SPF 30 or higher and take other sensible measures to protect your skin outdoors.
Trying to fix every patch immediately: Adding more product to a streak can make it darker. Check the manufacturer’s correction advice instead of layering additional mousse over an uneven area.
Using a body formula on the face without checking the label: Facial skin may be more sensitive, and not every product is designed for that area. Use only formulas approved for the intended application.
A more consistent tan usually comes from careful preparation and controlled application, not from using more product or following increasingly complicated routines.
Is Self Tanning Mousse Suitable for Everyone?
Many people use self-tanning products without problems, but suitability depends on the formula, skin condition, and individual sensitivities. If you have eczema, active dermatitis, broken skin, or another condition that makes your skin easily irritated, ask a healthcare professional whether a particular product is appropriate.
Read the ingredient list and follow all safety instructions. A product marketed as gentle or suitable for sensitive skin can still cause a reaction. If you have previously reacted to a self-tanner or one of its ingredients, avoid repeating that exposure without professional advice.
Use self-tanning mousse only as directed. Keep it away from the eyes, mouth, and other areas identified on the label, and do not inhale or ingest the product. DHA-based tanning products are intended for external cosmetic use; extra precautions are necessary when products are used in spray or mist forms because inhalation can create additional risks.
If a product causes a rash, persistent burning, or swelling, stop using it. Severe allergic symptoms, such as difficulty breathing or swelling of the throat, require emergency medical attention.
It is also important to remember that self-tanner does not replace sun protection. The color is cosmetic and does not mean your skin has developed meaningful protection against ultraviolet radiation. Apply sunscreen as directed whenever you spend time outdoors, even if your skin looks deeply bronzed.
Final Thoughts
Self tanning mousse can help create a temporary bronze appearance without the ultraviolet exposure associated with tanning in the sun. The best results usually come from choosing a suitable shade, preparing the skin gently, applying a controlled amount, and allowing the formula to develop according to its instructions.
Pay special attention to dry areas, hands, feet, and the transition between your face and body. These details can determine whether the result looks naturally blended or noticeably uneven. If the first application is lighter than expected, resist the urge to add excessive product before the initial color has fully developed.
Most importantly, treat self-tanner as a cosmetic choice rather than a substitute for healthy skin care or sun protection. With realistic expectations and a careful routine, you can find a finish that complements your natural skin tone without making the process unnecessarily complicated.
Self tanning mousse is a lightweight cosmetic product that temporarily darkens the appearance of the skin. Most formulas contain DHA, which reacts with the outermost layer of skin to create a tanned look without requiring sun exposure.
The color commonly lasts several days and gradually fades as the skin naturally renews itself. The exact duration depends on the formula, skin condition, bathing habits, and aftercare.
Start with clean, completely dry skin and gently exfoliate beforehand if needed. Apply the mousse with a tanning mitt, working in small sections. Use less product around the knees, elbows, ankles, hands, and feet to help prevent darker patches.



2 Comments