Some hairstyles look complicated from the outside but become much easier once you understand the technique behind them. Dutch braids are a perfect example. Their distinctive, raised pattern gives hair a woven, dimensional appearance, yet the basic method uses just three strands and a simple repeating movement.
Whether you want a practical hairstyle for a busy day, a cute look for an outing, or a foundation for more detailed braided styles, learning Dutch braids can open up plenty of possibilities. You can wear one braid, create two symmetrical braids, or use the technique as the starting point for a ponytail or updo.
What makes this hairstyle especially interesting is how much its appearance can change with small adjustments. A neat braid can look sporty and structured, while a slightly loosened braid can feel softer and more relaxed. This guide focuses on helping beginners understand the technique, choose a suitable starting style, and build confidence without getting overwhelmed by complicated instructions.
Understanding the Dutch Braid Technique
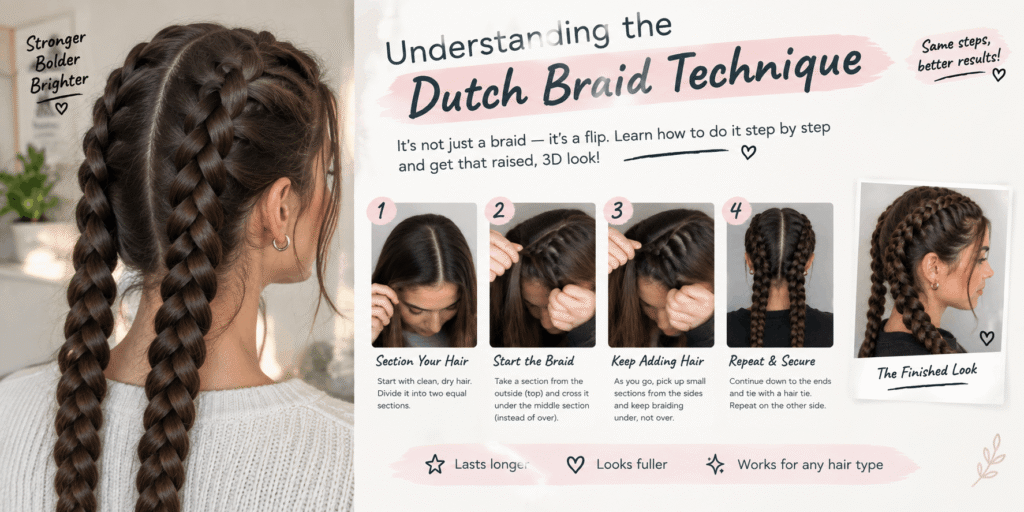
A Dutch braid is made by weaving three sections of hair together while gradually incorporating additional hair from the sides. Unlike a basic braid, which uses only the original three strands, this technique gathers hair as you move along the head.
The defining feature is the direction of the weave. Each side strand passes underneath the middle strand. As you repeat this movement and add more hair, the braid forms a raised pattern that sits visibly on top of the surrounding hair.
You may also hear Dutch braids described as reverse French braids. The names refer to the difference in how the strands cross, rather than completely different braiding methods. Once you understand that small distinction, it becomes easier to recognize the pattern and practice it.
Dutch Braids vs. French Braids
| Feature | Dutch Braids | French Braids |
|---|---|---|
| Strand direction | Side strands cross underneath the middle | Side strands cross over the middle |
| Appearance | Raised, prominent braid | More blended, woven appearance |
| Visual effect | The braid stands out from the hair | The braid appears integrated into the hair |
| Common variations | Single, double, side, ponytail, and updo styles | Single, double, side, ponytail, and updo styles |
| Beginner reminder | Think “under the middle” | Think “over the middle” |
Neither technique is limited to one particular hair length or occasion. Both can be adapted to different styles, and the choice often comes down to the finish you prefer.
Prepare Your Hair for Easier Braiding
A little preparation can make Dutch braids much easier to manage. Hair that is tangled or difficult to separate may interrupt your rhythm, so begin by gently detangling it. If your hair knots easily, work from the ends upward rather than pulling a brush through the entire length at once.
Your hair does not need to be perfectly smooth. Natural waves and curls can add texture to the finished braid, while straighter hair may create a more defined, tidy appearance. The best starting condition is simply one that allows you to separate and hold the strands comfortably.
Gather a few useful tools before you begin:
- A brush or wide-tooth comb for detangling
- A tail comb for making a part
- Small hair elastics to secure the braid
- Sectioning clips if you want to keep unused hair out of the way
- A lightweight styling product, if needed for managing flyaways
You can complete a basic Dutch braid without using every item on this list. The comb and elastic are the essentials; the other tools are optional helpers.
If your hair is very slippery, a small amount of styling product may make the sections easier to control. Avoid applying too much, because heavy or sticky product can make the strands harder to separate.
Your First Dutch Braid: A Simple Step-by-Step Method
For a first attempt, choose a single Dutch braid that begins near the crown and continues toward the nape of your neck. This gives you an opportunity to learn the weaving pattern before trying more elaborate placements.
Step 1: Decide Where You Want the Braid to Begin
Stand somewhere with good lighting and use a mirror if it helps you see the sections. Gather a portion of hair from the crown of your head, near the area where you want the braid to start.
You do not need to take an extremely large section. A manageable starting section can make it easier to keep the strands separate while you learn the movement.
Step 2: Divide the Section Into Three Strands
Separate the gathered hair into three sections that are reasonably similar in size. Think of them as the left, middle, and right strands.
Keep a comfortable grip on each section. If you hold the hair too tightly, your hands may become uncomfortable and it may be harder to adjust the braid as you go.
Step 3: Move the Right Strand Underneath
Take the right strand and pass it underneath the middle strand. The strand that was on the right now becomes the middle strand.
This movement is the foundation of Dutch braiding. Take a moment to notice which strand has moved to the center before continuing.
Step 4: Move the Left Strand Underneath
Now take the left strand and cross it underneath the new middle strand. The left strand becomes the middle strand.
You have completed one basic weaving sequence. Before adding extra hair, practice the rhythm of right underneath, then left underneath, until the movement starts to feel familiar.
Step 5: Incorporate Hair From the Right Side
Pick up a small section of loose hair from the right side of your head. Combine it with the right strand you are holding.
Cross this combined section underneath the middle strand. Try to gather hair from near the braid so that the added section follows its direction naturally.
The amount of hair you add will affect the braid’s appearance. Smaller additions can create a more detailed pattern, while larger sections may make the braid wider.
Step 6: Incorporate Hair From the Left
Gather a small section of loose hair from the left side and combine it with the left strand.
Pass the combined section underneath the middle strand. Keep the braid close to your head, but do not pull so firmly that it becomes uncomfortable.
At this point, the raised pattern should begin to become more visible.
Step 7: Keep Building the Braid Downward
Continue alternating between the two sides. Add loose hair to the right strand and cross it underneath the middle, then add hair to the left strand and cross that underneath.
Work gradually toward the nape of your neck. If your hands become confused, pause and identify the three strands again rather than rushing through the next movement.
Step 8: Finish With a Regular Braid
When all the loose hair you want to include has been incorporated, you can stop adding new sections.
Continue braiding the remaining length using the same three-strand underneath movement. When you reach the ends, secure the braid with a small elastic that holds the hair without pulling excessively.
Step 9: Refine the Finished Look
Check the braid from the front and sides to see how it sits. You can gently smooth loose strands or use a discreet pin to secure a piece that has slipped out.
If you like a fuller appearance, carefully loosen a few outer edges with your fingertips. Make small adjustments rather than pulling large sections, since too much loosening can make the braid lose its shape.
For a more defined finish, leave the weave compact and smooth only the loose flyaways.
Small Technique Changes That Make a Big Difference
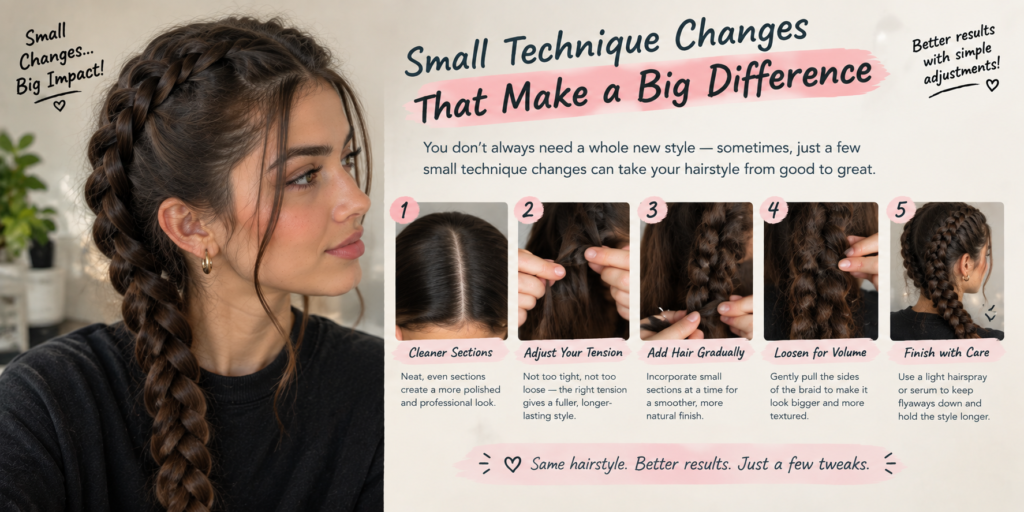
The difference between a braid that feels difficult and one that becomes manageable often comes down to section control. You do not need to braid quickly. A steady rhythm and a comfortable grip can make the process easier to repeat.
Try to add hair from similar areas on both sides. If you consistently gather a much larger section from one side, the braid may begin to curve or look uneven. Small differences are normal, especially when you are learning, but checking your sections can help you correct the direction.
Your hand position matters, too. Keeping your hands reasonably close to the braid can make it easier to control the strands. If you move too far away from your head, the sections may loosen before you have a chance to weave them together.
It is also useful to remember that a Dutch braid does not need to look identical from every angle. Natural layers, different hair textures, and the shape of your head can affect the finished result. Aim for a comfortable, balanced braid rather than trying to make every strand perfectly uniform.
Which Dutch Braid Style Should You Learn Next?
Once the basic braid feels familiar, you can use the same technique to create a variety of looks. You do not need to master every variation at once; choosing one new style gives you a chance to practice without making the process unnecessarily complicated.
| Dutch braid style | What makes it different | A useful starting tip |
|---|---|---|
| Single Dutch braid | One raised braid running down the head | Practice the basic three-strand method |
| Double Dutch braids | Two braids created on either side of a part | Make a clear center part first |
| Side Dutch braid | The braid follows a diagonal or side placement | Start with a smaller section near the hairline |
| Dutch braid ponytail | The braid joins the rest of the hair in a ponytail | Decide where you want the ponytail to sit |
| Dutch braid updo | Braids are wrapped or pinned into a gathered style | Secure the braid comfortably before pinning |
A single Dutch braid is a useful foundation because it lets you concentrate on the weaving movement. Double Dutch braids introduce the extra challenge of keeping two sides reasonably balanced, while side braids require you to guide the pattern along a different direction.
Ponytails and updos are ways to incorporate a finished braid into another hairstyle. You can explore these options once you feel comfortable with the basic technique.
What to Remember Before Practicing
Learning Dutch braids is a coordination skill, and the first few attempts may feel awkward. That is normal. You are learning to hold three strands, add new hair, and repeat a movement while working in an area you may not be able to see directly.
Start slowly, keep your sections manageable, and take breaks if your hands become uncomfortable. If the braid begins to loosen, you can pause and reset your grip instead of pulling harder.
Most importantly, do not treat a perfectly symmetrical braid as the only successful result. A slightly relaxed braid can still look lovely, and each attempt can help you understand how your own hair behaves.
5 Dutch Braid Hairstyles to Try
1. Side Dutch Braid
A side Dutch braid is a lovely variation if you want something a little different from a braid running straight down the back of your head. It begins near one side of the crown and follows the curve of your head toward the opposite shoulder or down one side.
To create this style, make a side part and gather a section of hair near the heavier side of the part. Divide it into three strands and begin the Dutch braid technique, adding hair as you move along the side of your head.
You can guide the braid diagonally toward the nape of your neck, then continue with a regular three-strand braid through the remaining length. Secure the ends with an elastic.
For a softer finish, allow a few face-framing pieces to remain loose if you prefer. You can also gently loosen the braid’s outer edges once it is secured. This style works for casual outings, family gatherings, and occasions when you want a braid with a little movement.
2. Double Dutch Braids
Double Dutch braids are created by dividing the hair into two sections and braiding each side separately. They are often associated with sporty hairstyles, but the finish can be adapted to look casual, neat, or more decorative.
Start by creating a straight part from the front hairline to the nape of your neck. Clip one side away while you work on the other. Begin near the crown, divide the hair into three strands, and use the same underneath-crossing technique from Part 1.
As you move down the head, add hair from the corresponding side until you reach the nape. Finish the length with a regular braid and secure it. Repeat on the other side.
Try to keep the two braids similar in size, but do not worry if they are not perfectly identical. Natural hair growth patterns and differences in hand position can make each side look slightly different.
Double Dutch braids can be worn with the ends braided all the way down or secured into two ponytails. If you want a softer appearance, gently loosen the braids after securing them.
3. Dutch Braid Updo
A Dutch braid updo combines braiding with a gathered hairstyle. It can be a useful option for celebrations, formal occasions, or days when you want your hair away from your shoulders.
One approach is to create two Dutch braids, one on each side of the head, and bring their lengths together at the back. Twist or wrap the remaining braided lengths into a bun and secure them with hairpins.
Another option is to create a Dutch braid along one side of the head and wrap the remaining hair into a low bun. This creates an asymmetrical look without requiring several separate braids.
The most important part is securing the updo comfortably. Use enough pins to keep it in place, but avoid pulling the braids tightly against your scalp. If you are wearing the style for several hours, check that the pins are not pressing uncomfortably.
4. Dutch Braid Ponytail
A Dutch braid ponytail combines a raised braid with a simple ponytail. It can look polished while keeping much of the hair gathered together.
Begin by creating a Dutch braid along the crown or one side of your head. Once you reach the point where you want the ponytail to begin, gather the remaining hair together with the braid and secure it using a hair elastic.
You can leave the ponytail straight, add loose waves, or braid the ponytail itself. If you want a more relaxed appearance, gently loosen the braid before securing the ponytail.
For a more understated style, create one narrow Dutch braid near the hairline and gather the rest of your hair into a low ponytail. This gives the hairstyle a small braided detail without making the entire look feel elaborate.
5. Half-Up Dutch Braid
A half-up Dutch braid is a useful option when you want some hair gathered away from your face while leaving the rest loose. It can work with straight, wavy, or curly hair, depending on how you prepare and secure the sections.
Take a section from the crown or front of your head and begin a Dutch braid. Add hair only from the area you want included in the braid, then stop when you reach the back of the crown.
Secure the braid with a small elastic or pin it discreetly into place. Leave the remaining hair loose.
You can create one central braid or two smaller braids that meet at the back. This variation works well when you want a hairstyle that feels less structured than a full braid.
How Dutch Braids Work With Different Hair Textures
Dutch braids can be created on many hair textures, but the preparation and finishing techniques may need to change. Straight, wavy, curly, and coily hair can all be braided, although the way each texture behaves may affect the final appearance.
Straight hair can sometimes feel slippery, especially when it has been freshly washed or conditioned. Working with small, controlled sections and using a light styling product may help you maintain your grip. Avoid adding too much product, as buildup can make the hair feel heavy or difficult to handle.
Wavy hair can create a relaxed, textured finish. You may find that the braid looks slightly different depending on whether your waves are brushed out or left more natural. Detangle gently before braiding, and avoid brushing in a way that creates unnecessary frizz.
Curly hair can be braided in its natural state or after being stretched through a preferred styling method. If you choose to braid curls, work gently and make sure the sections are not tangled. A little leave-in conditioner or another suitable product may help with manageability, depending on your hair’s needs.
Coily hair can also be styled into Dutch braids. Sectioning carefully and working with manageable portions can make the process easier. If you prefer to braid stretched hair, use a method that suits your hair and avoid excessive heat or tension.
The same general principle applies to every texture: the braid should feel secure but not painful. You should never need to pull harshly to make the style stay in place.
Choosing Between a Neat and a Loose Dutch Braid
A neat Dutch braid has clearly defined sections and a close, structured appearance. It can be useful for sports, busy days, or occasions when you want a tidy hairstyle.
A looser Dutch braid has a softer appearance, with slightly expanded sections and a more relaxed finish. It can work well for casual outfits, celebrations, or styles that pair with loose waves.
To create a neater braid, keep your sections organized and maintain a consistent grip as you add hair. Try not to pull one side much more firmly than the other.
For a looser look, secure the braid first, then gently widen the outer edges with your fingertips. Start near the bottom and work upward, making small adjustments rather than pulling large sections at once.
If your hair is layered, some shorter pieces may naturally fall out of the braid. You can leave them as soft details or secure them with discreet pins if you prefer a more controlled finish.
Common Dutch Braid Problems and How to Fix Them
The Braid Looks Uneven
Uneven braids often happen when the sections are different sizes or when more hair is added from one side than the other. Try to gather similar amounts of hair as you move down the head.
It can also help to pause occasionally and check the braid’s direction. If it begins shifting, adjust your hand position before continuing.
The Braid Feels Too Tight
A braid should not cause pain or a strong pulling sensation. If it feels uncomfortable, loosen it or start again with less tension.
Avoid pulling the hair tightly around the hairline, especially if you plan to wear the braid for a long period. A comfortable braid is more important than making every section look perfectly flat.
Small Pieces Keep Slipping Out
Short layers, flyaways, and slippery strands may escape while you braid. Working with smaller sections can help you control the hair more easily.
You can also use a small amount of suitable styling product to manage flyaways. If a few pieces remain loose, discreet pins may help secure them without requiring you to pull the entire braid tighter.
The Braid Does Not Look Raised
If your braid looks more like a French braid, check the direction of your crossings. In Dutch braiding, each side section passes underneath the middle strand, not over it.
Practice the basic movement slowly before adding more hair. Once the underneath pattern becomes familiar, the raised appearance should become easier to create.
How to Keep Dutch Braids Comfortable and Neat
A Dutch braid can stay in place for a good portion of the day when it is secured appropriately, but comfort and hair care should come first. Avoid making the braid excessively tight just to extend its wear.
Choose hair elastics that hold securely without pulling harshly. If your hair is prone to tangling, avoid elastics that catch or snag the strands when you remove them.
When taking down the braid, remove the elastic carefully and undo the woven sections gradually. Do not pull the braid apart forcefully, because that can create tangles and unnecessary breakage.
If you have used styling products, follow your usual cleansing routine when needed. You do not have to wash your hair every time you wear a braid; choose a routine that suits your scalp and hair.
Sleeping With Dutch Braids
Some people choose to sleep with loose braids to keep their hair gathered overnight. If you do this, make sure the braid is comfortable and not pulling at the roots.
A soft scrunchie or suitable fabric-covered elastic may be more comfortable than a tight band. You can also use a smooth pillowcase or a hair covering that works for your hair texture to help reduce friction.
If the braid feels tight when you lie down, loosen it or take it out before sleeping. There is no need to keep a style in place if it causes discomfort.
How to Make Dutch Braids Feel More Personal
Small styling changes can make Dutch braids feel different without changing the basic technique. You might add a ribbon to the finished braid, use a decorative elastic, or pair the style with a few loose face-framing pieces.
For a simple everyday look, keep the braid clean and use a plain elastic. For a special occasion, a small hair accessory can add detail without requiring complicated braiding.
You can also combine Dutch braids with other hairstyles. A braid can lead into a ponytail, meet another braid at the back of the head, or become part of a bun. Experiment with placement and finishing rather than trying to add every possible detail at once.
The most useful approach is to begin with a style you can comfortably create, then make small changes as your confidence grows.
Final Thoughts
Dutch braids are a versatile hairstyle that can be adapted for everyday wear, special occasions, and different hair textures. Their raised appearance comes from crossing the side strands underneath the middle section while gradually adding hair.
Once you have mastered the basic method, you can experiment with side Dutch braids, double Dutch braids, ponytails, half-up styles, and braided updos. Each variation uses the same core technique, but changes the placement or finish to create a different result.
Keep your sections manageable, practice slowly, and avoid pulling too tightly. With patience, Dutch braids can become a useful styling option that feels personal, comfortable, and easy to adapt