
If you want the length and structure of an enhancement without the heavier feel of some traditional systems, polygel nails offer an interesting middle ground. This hybrid nail enhancement combines characteristics associated with gel and acrylic systems, allowing the product to be shaped before it is cured under a lamp.
Polygel has become popular because it gives nail technicians plenty of control during application. Unlike some liquid-and-powder systems that begin setting relatively quickly, polygel generally stays workable until it is cured. That extra control can make it easier to create an even surface and customize the shape.
But there is more to polygel than simply choosing a color and curing it. Understanding how the system works, how long it can last, and how it compares with other enhancements can help you decide whether it suits your manicure routine.
Understanding Polygel Nails
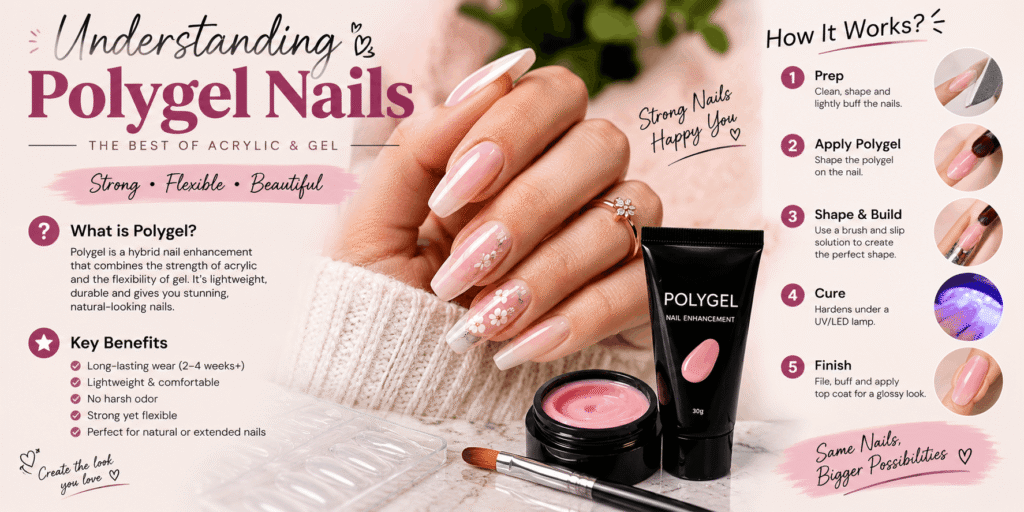
Polygel nails is a type of nail enhancement material designed to combine some of the characteristics of acrylic and gel. It typically comes in a thick, putty-like consistency rather than the liquid texture associated with traditional acrylic monomer and powder systems.
That texture is one of the biggest differences you’ll notice during application. The product can be placed onto the natural nail or an extension form and then shaped with a brush before being cured.
Because it doesn’t generally harden simply from exposure to air, the technician has more time to position the material. This can be particularly useful when creating a specific nail shape or correcting uneven areas.
Once the desired structure has been created, the polygel is cured using an appropriate UV or LED nail lamp. After curing, it becomes a solid enhancement that can then be filed, refined, and finished with polish or nail art.
The final appearance depends heavily on the application technique. A well-structured set can look smooth and natural, while excessive product or poor shaping can make the nails appear bulky.
Why the Texture Makes a Difference
Traditional acrylic and polygel may feel quite different while they are being applied.
Acrylic systems usually involve combining a liquid monomer with polymer powder, creating a workable mixture that begins setting as it is exposed to air. The technician therefore needs to work efficiently.
Polygel generally offers a longer working window before curing. The technician can continue manipulating the material until the nail has the desired shape.
This doesn’t automatically make polygel easier for everyone. Proper application still requires knowledge of nail preparation, product control, structure, curing, and finishing.
For someone doing a professional service, the additional control can be useful. For someone attempting an at-home application, however, the learning curve can still be significant.
What Makes Polygel Different From Ordinary Gel Polish?
One important distinction is that polygel isn’t simply another type of gel polish.
Gel polish is primarily designed to add color and finish to the natural nail or an existing enhancement. Polygel is a structural enhancement material. It can be used to add length, build an apex, reinforce the nail, and create a new shape.
This means polygel can be much thicker than ordinary gel polish.
Applying a structural product correctly also requires attention to how the material is distributed across the nail. The thickness should not be random. The enhancement needs enough structure to withstand normal use without becoming unnecessarily bulky.
How Polygel Nails Are Created
A typical polygel nails service begins with preparation rather than immediately applying the enhancement.
The natural nail is cleaned and prepared so that the product can adhere properly. Depending on the system, preparation may involve gently removing surface shine, shaping the natural nail, and using compatible preparation products.
The goal is to prepare the nail without aggressively thinning or damaging it.
Once preparation is complete, the technician places the polygel onto the nail. A special brush is used to shape the material, often with the help of a suitable slip solution recommended for the particular system.
The product can be moved across the nail until the desired thickness and shape are achieved.
If an extension is wanted, the material can be built over a form or compatible nail tip. This allows the natural nail to appear longer while giving the technician a base for creating the chosen shape.
After the structure has been perfected, the nail is placed under the appropriate lamp for curing. The exact curing time depends on the product, lamp, and manufacturer’s instructions, so there isn’t one universal curing time that applies to every polygel system.
Once cured, the nail can be refined with filing and then finished with color, top coat, or nail art.
Why Nail Preparation Matters
Preparation is easy to overlook because most of the visual transformation happens after the polygel is applied.
However, poor preparation can affect adhesion and durability. If the natural nail is contaminated with oils, dust, or other residue, the enhancement may not adhere as intended.
At the same time, preparation should not involve aggressive scraping or excessive filing. The natural nail is not something that needs to be dramatically thinned to make an enhancement work.
A careful technician should focus on creating a clean, appropriate surface while preserving the natural nail underneath.
Building the Right Shape
Polygel nails can be shaped into many popular nail forms, including square, almond, coffin, oval, and other customized silhouettes.
The shape you choose can change the entire appearance of the manicure.
Almond shapes tend to create a tapered appearance, while square nails maintain more defined corners. Coffin-shaped nails combine a tapered structure with a flatter tip.
Length also matters. A short polygel overlay can provide reinforcement without dramatically changing the appearance of the natural nail. Longer extensions create more room for dramatic shapes and detailed nail art.
The most important consideration is proportion. A very long extension requires an appropriately structured enhancement because additional length changes the amount of leverage placed on the natural nail.
How Long Can Polygel Nails Last?
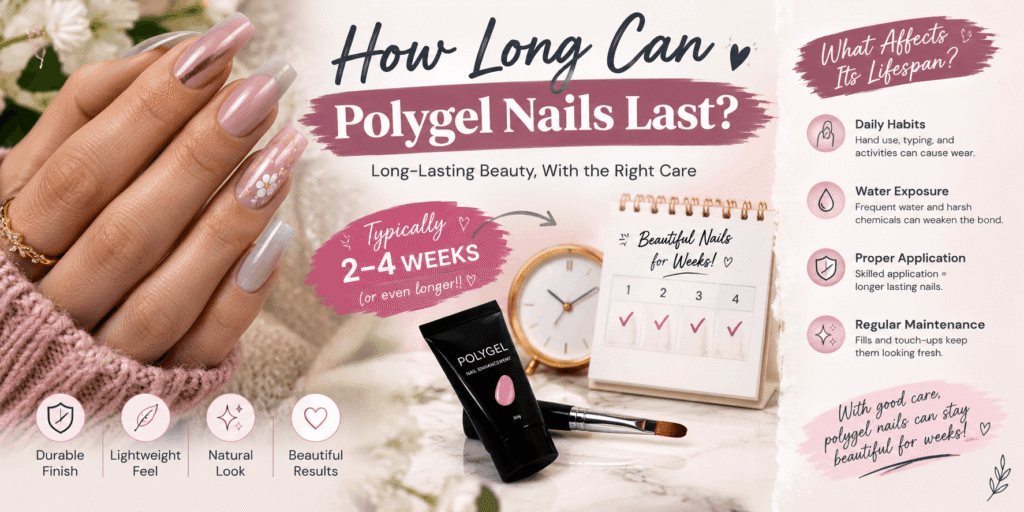
One reason people choose polygel is its potential durability.
A professionally applied set can often remain wearable for several weeks, but the exact lifespan varies considerably. Natural nail growth, daily activities, application quality, product compatibility, and aftercare all influence how long the manicure remains in good condition.
As the natural nail grows, a visible gap develops between the cuticle area and the enhancement. Even if the polygel itself still looks intact, the growing nail changes the balance and appearance of the set.
That is why maintenance appointments are generally needed before the enhancement becomes excessively grown out.
Trying to keep the same set indefinitely isn’t a good substitute for proper maintenance. As the nail grows, the structure may no longer sit in the ideal position, which can increase the chance of lifting or breakage.
What Can Make a Set Lift Early?
Several things can affect adhesion.
Improper nail preparation is one possibility. Another is product contacting the surrounding skin during application. If enhancement material is applied onto the skin around the nail, it can create areas where lifting begins.
Daily habits can matter too. Repeated exposure to water, cleaning products, impact, and picking at lifted edges can shorten the life of a manicure.
If you notice lifting, avoid pulling the enhancement off. Picking or forcibly removing it can take layers of the natural nail with it.
Does Polygel Damage Natural Nails?
Polygel itself isn’t automatically synonymous with damaged nails. The condition of the natural nail depends on factors such as application, removal, preparation, product compatibility, and aftercare.
Aggressive filing is one issue to watch. The natural nail shouldn’t be excessively thinned in an attempt to improve adhesion.
Removal is another major factor. An enhancement should be removed according to the instructions for the particular system rather than being peeled or forcibly pulled away.
Repeated cycles of aggressive preparation and removal can leave natural nails feeling thinner or weaker.
There is also the issue of curing. Products that require a lamp should be cured using the system’s recommended lamp and instructions. Incomplete curing can create problems with the finished enhancement and may increase the risk of skin exposure to uncured product.
For that reason, professional application can be particularly useful when you’re unfamiliar with the system.
Keeping the Natural Nail in Good Condition
Even when wearing enhancements, basic nail care still matters.
Try not to use the enhanced nails as tools. Opening packages, scraping surfaces, or forcing objects apart can put considerable stress on the enhancement and the natural nail underneath.
Moisturizing the surrounding skin can also help maintain a neat appearance. Cuticle oil or another suitable moisturizer can be incorporated into your regular routine.
If an enhancement becomes damaged or starts lifting, address it rather than continuing to wear it until it breaks completely.
And when it’s time for removal, resist the temptation to peel the material away. Proper removal takes longer than simply pulling it off, but protecting the natural nail is more important than saving a few minutes.
Polygel vs. Acrylic vs. Builder Gel
Polygel is often discussed alongside acrylic and builder gel because all three can be used for structured nail enhancements, but they are not identical systems.
Acrylic traditionally uses a liquid monomer and powder polymer that are combined during application. It begins setting without the need for a curing lamp, giving the technician a limited working period.
Builder gel is a gel-based enhancement material that is generally cured under a UV or LED lamp. Depending on the specific formula, it can be used for overlays, strengthening, or adding length.
Polygel has a thick consistency and is also cured with a lamp. Its putty-like texture allows the technician to manipulate the material before curing.
The differences aren’t simply about which one is “strongest.” Application technique, nail preparation, structure, maintenance, and removal can all influence the final result.
Which One Feels Most Natural?
The answer can vary depending on the product and application.
A thin, properly structured enhancement can feel relatively comfortable regardless of the system used. A thick or poorly balanced set may feel heavy even if the underlying material is marketed as lightweight.
Polygel is often chosen by people who like the idea of a structured enhancement without the traditional acrylic application process.
Which One Is Easier to Shape?
Polygel’s thick consistency can provide significant control because the material generally stays where it is placed until manipulated or cured.
That doesn’t mean creating professional-looking nails is effortless. Getting the correct apex, sidewalls, thickness, and overall symmetry still requires practice.
The material may be forgiving in one part of the process while demanding precision in another.
Making Polygel Nails Last Longer Without Overcomplicating Your Routine
One of the appealing things about polygel nails is that they can be customized to suit different lengths and shapes. However, keeping a set looking neat for several weeks depends heavily on what happens after the appointment. Even a carefully applied manicure can begin lifting, cracking, or losing its clean appearance if the nails are repeatedly exposed to unnecessary stress.
The simplest approach is to treat enhanced nails as an extension of your natural nails rather than as tools. Avoid using them to open packages, scrape surfaces, or pick at objects. Small impacts that seem harmless can eventually create cracks or lifting around the edges.
Water exposure can also affect the overall manicure experience. Wearing suitable gloves during prolonged household cleaning or similar tasks can help protect both the enhancement and the surrounding skin. You don’t need to avoid water completely; the goal is simply to reduce unnecessary and prolonged exposure to harsh conditions.
Keeping the area around the nails moisturized is another easy habit. Cuticle oil or a suitable hand moisturizer can help keep the surrounding skin from becoming excessively dry. Apply it regularly, particularly after washing your hands.
Most importantly, pay attention to lifting. If part of the polygel begins separating from the natural nail, don’t pull or peel it away. A damaged or lifted enhancement is better repaired or professionally removed than forcibly detached.
When Should Polygel Nails Be Maintained or Replaced?
Natural nails continue growing underneath an enhancement, so even a durable set eventually needs attention.
As the nail grows, the area near the cuticle becomes visible. The original structure of the enhancement also moves farther away from the ideal position on the nail. This can affect both appearance and balance.
A maintenance appointment allows the grown-out area to be addressed and the structure to be restored. The exact timing depends on how quickly your nails grow and the condition of the set.
Waiting until the enhancement is severely grown out isn’t ideal. A nail that has lifted, cracked, or become significantly unbalanced should be dealt with rather than left until the next convenient appointment.
If you’re regularly wearing polygel, a nail professional can also check whether your natural nails are tolerating the enhancement well.
Removing Polygel Nails the Right Way
Removal is one of the most important parts of wearing any nail enhancement.
The first rule is simple: don’t peel the polygel off.
When you force an enhancement away from the natural nail, you can remove layers of the natural nail along with it. This can leave the nail surface uneven, thin, or sensitive.
The exact removal process depends on the particular polygel system. Some products can be filed down and removed with an appropriate soaking process, while others may require a different procedure. Always follow the manufacturer’s instructions for the specific product.
Professional removal can be especially useful when you’re unsure what type of system was used.
After removal, don’t immediately attack the natural nail with aggressive buffing. Give it gentle care and keep the surrounding area moisturized.
If the natural nail appears unusually damaged or there is persistent discomfort, seek professional advice rather than covering the issue with another enhancement.
Can You Put Regular Polish Over Polygel?
Yes, polygel can generally be used as a foundation for different manicure finishes, depending on the products involved.
A cured and properly finished enhancement can provide a smooth surface for color. This makes polygel particularly versatile for people who enjoy changing their manicure appearance.
However, product compatibility matters. Different gel products, top coats, and polygel systems may have specific instructions for layering.
If you’re changing colors frequently, remove the old color carefully rather than aggressively filing the surface of the enhancement each time.
You can also choose a clear or natural-looking polygel finish when you want the structure of an enhancement without a dramatic color.
Polygel and Nail Art Open Up Many Options
One reason polygel has become popular is that the enhancement provides a stable canvas for creative designs.
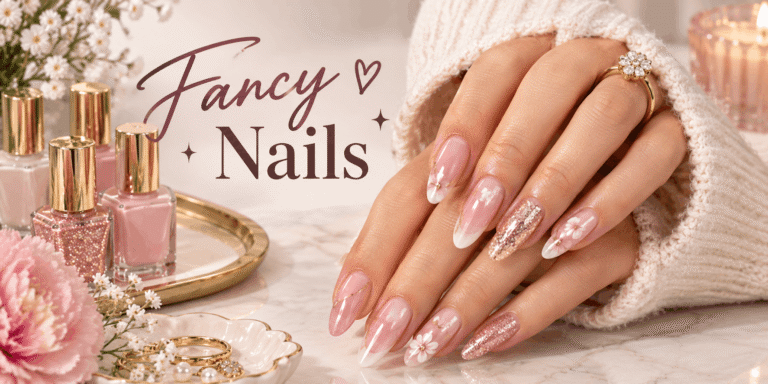
Simple nude finishes can make the structure look understated, while French tips, gradients, metallic details, patterns, and other designs can create a much more noticeable manicure.
The length and shape also influence how much room you have for nail art.
Shorter polygel nails can look clean with a simple finish, while longer extensions provide additional space for more detailed designs.
You don’t need an elaborate design for the manicure to look polished. A carefully shaped nail with a single color can be just as effective as a highly decorated set.
UV and LED Lamps: What You Should Know
Polygel systems that require curing use UV or LED nail lamps to harden the product.
Both types of lamps emit ultraviolet radiation, although the exact characteristics and curing times vary between devices and products. Following the manufacturer’s curing instructions is important because the lamp needs to be compatible with the product being used.
The amount of UV exposure from nail lamps is relatively brief during a typical manicure, but repeated exposure is still something people may reasonably want to minimize.
If you’re concerned about UV exposure, you can ask a nail professional about practical protective measures, such as products designed for use during nail services. Sunscreen may also be considered for exposed skin, but it should not be applied where it could interfere with product adhesion unless the nail professional advises otherwise.
The most important point is to use the correct lamp and cure the product completely. Do not assume that keeping your hands under a lamp for an arbitrary amount of time is a substitute for following the product’s instructions.
Common Polygel Mistakes That Can Ruin a Manicure
A beautiful polygel set can be affected by a few avoidable mistakes.
Applying too much product is one of them. More material doesn’t automatically mean stronger nails. Excessive thickness can make the enhancement look bulky and may affect its balance.
Poor preparation can create another problem. If the nail isn’t appropriately prepared, the product may not adhere as intended.
Allowing product to touch the surrounding skin is also something to avoid. The enhancement should be carefully controlled during application rather than spread onto the cuticle area.
Another mistake is ignoring lifting. Once an enhancement begins lifting, moisture and debris can become trapped underneath. Instead of repeatedly pressing the lifted area down or applying more product over it, have the problem addressed properly.
Finally, don’t treat every polygel kit as interchangeable. Different brands and systems can have different preparation, curing, and removal requirements.
How to Decide Whether Polygel Is Right for You
Polygel may be worth considering if you like structured nails, want the option of additional length, and prefer a material that can be shaped before curing.
It can also be useful if you enjoy changing your nail shape or experimenting with different finishes.
On the other hand, if you prefer very short, natural nails and don’t need additional structure, a simple polish or strengthening treatment may be enough for your routine.
Your lifestyle matters too. Someone who frequently works with their hands may prefer a shorter enhancement that doesn’t interfere with daily activities. Someone who enjoys longer nails may be comfortable with a more substantial design.
Rather than choosing an enhancement because it is trending, think about how the nails will fit into your everyday life.
Final Thoughts
Polygel nails offer a flexible approach to nail enhancements because they combine a workable, putty-like texture with a cured structure that can be shaped into different lengths and forms. That makes them suitable for everything from short overlays to longer, more elaborate manicures.
The material itself, however, isn’t the only thing that determines the result. Proper preparation, controlled application, compatible curing equipment, regular maintenance, and careful removal all play important roles.
If you’re considering polygel for the first time, start by thinking about what you actually want from your manicure. Do you need additional length? Do you want a particular shape? Are you looking for extra structure? Or are you mainly interested in creating a smooth surface for nail art?
Once you know the answer, it becomes much easier to decide whether polygel fits your needs.
And if you do choose it, remember that good nail care continues after the salon appointment. Keep the surrounding skin moisturized, avoid using the nails as tools, don’t ignore lifting or cracks, and never peel an enhancement away from the natural nail.
With the right application and maintenance routine, polygel can provide a customizable foundation for a clean everyday manicure or a much more creative nail design.
A professionally applied polygel set can often remain wearable for several weeks, although the exact duration varies with nail growth, application quality, lifestyle, and aftercare.
Maintenance becomes necessary as the natural nail grows and the enhancement becomes more difficult to keep balanced.
Neither system is automatically better for everyone.
Polygel offers a thick, workable texture that can be shaped before curing, while traditional acrylic uses a liquid-and-powder system that sets without a curing lamp.
Your preferred application process, desired appearance, nail length, maintenance routine, and professional technique can all influence which system suits you.
The condition of the natural nail depends heavily on preparation, application, maintenance, and removal rather than simply the name of the enhancement system.
Aggressive filing or peeling off an enhancement can damage the natural nail regardless of whether the enhancement is polygel or acrylic.


3 Comments