
A curling wand can transform straight or slightly wavy hair into soft waves, defined curls, or a voluminous style without requiring a traditional curling iron with a clamp. The real secret, however, is not simply wrapping your hair around a heated barrel. Choosing the right wand, understanding your hair type, and using the correct technique can make the difference between curls that look polished and curls that fall flat within an hour.
Whether you prefer loose, beach-inspired waves or tighter curls with plenty of definition, learning how to use a curling wand gives you more control over your finished hairstyle. With the right approach, you can also create different looks using the same tool while reducing unnecessary heat exposure.
What Makes a Curling Wand Different From Other Hair Tools?
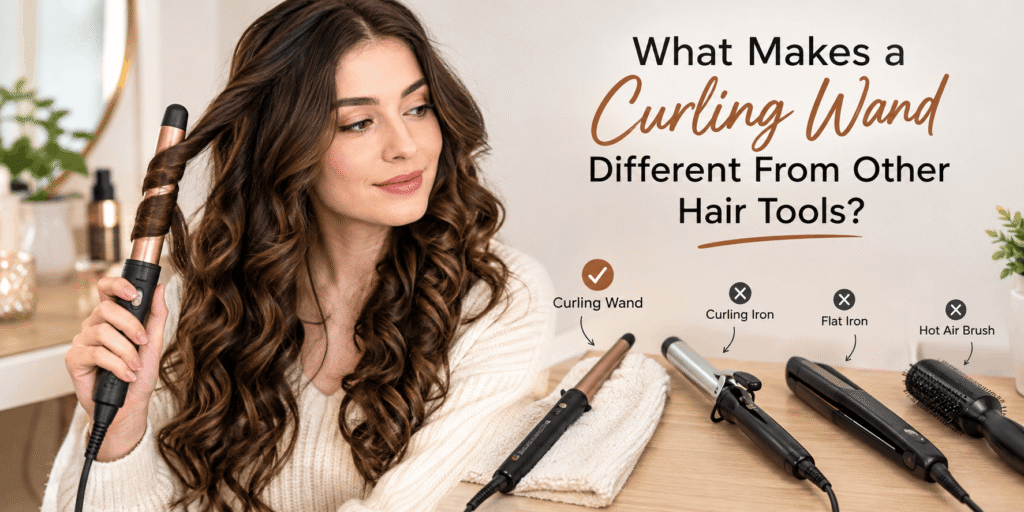
A curling wand is a heated hairstyling tool with a barrel around which you manually wrap sections of hair. Unlike many traditional curling irons, it does not use a clamp to hold the hair in place. This open-barrel design gives you greater freedom to create curls that vary in shape, direction, and tightness.
Because there is no clamp pressing against the hair, a wand can create curls without the visible crease that sometimes appears when a curling iron is used incorrectly. The result depends on how you position the hair, how tightly you wrap it, and how long you hold each section around the barrel.
Curling wands are available in several barrel shapes and sizes. Some have a consistent diameter from top to bottom, while others taper toward the tip. A uniform barrel generally creates curls with a more consistent width, whereas a tapered wand can produce curls that look narrower at the ends and fuller near the roots. Neither design is automatically better; the right option depends on the hairstyle you want to achieve.
Another important difference is the level of control required. A clamp-free wand makes it easier to change the angle and wrapping pattern, but you must hold the hair in position yourself. Beginners may need a little practice before their curls look even. Using a heat-resistant glove and working with manageable sections can make the process easier.
Choosing a Barrel Size That Matches Your Desired Curls
The diameter of the barrel influences the size and appearance of your curls. Although hair length, texture, and styling technique also matter, barrel size is one of the simplest ways to guide your results.
Small Barrels
Small barrels: These are useful for tighter, more defined curls, particularly on shorter hair or when you want a more structured finish. They can also help curls remain visible longer in hair that struggles to hold a wave.
Medium Barrels
Medium barrels: These offer versatility for everyday styling. Depending on your wrapping technique and hair length, they can create defined curls, relaxed spirals, or softer waves.
Large Barrels
Large barrels: These are often chosen for loose curls, brushed-out waves, and styles with a softer silhouette. Very large barrels may produce only a slight bend in long or heavy hair.
Tapered Barrels
Tapered barrels: These can create curls that vary in width along each section, giving the hairstyle a less uniform appearance.
Do not choose a wand based on barrel size alone. If your hair is long and heavy, a large barrel may produce waves that disappear quickly. If your hair is short, a wide barrel may not provide enough room to form a complete curl. Consider both your hair length and your preferred finish before buying a tool.
Straight, Tapered, or Interchangeable: Which Design Makes Sense?
A straight-barrel wand is a practical choice if you prefer curls that look relatively uniform throughout your hair. It is especially useful when you want a consistent result for a polished hairstyle, although changing the direction of each section can make the overall look more natural.
A curling wand offers more variation. The wider part of the barrel creates a fuller curve, while the narrower area can form a tighter curl. Since the barrel changes size along its length, you may need to pay closer attention to where you wrap each section to avoid noticeably different results.
Interchangeable curling wands come with multiple barrels that attach to one handle. This design can be convenient if you regularly switch between loose waves and defined curls. However, a set is only worthwhile if you expect to use its different attachments. A reliable wand that suits your usual hairstyle may be more practical than a large collection of accessories you rarely need.
How to Prepare Your Hair Before Using a Curling Wand
The appearance of your curls depends partly on what you do before turning on the tool. Hair that is tangled, damp, or coated with heavy styling products can be more difficult to style evenly. Preparing it properly helps you create a smoother finish and makes it easier to work through each section without repeatedly applying heat.
Start with completely dry hair. Using a hot curling wand on damp hair can cause rapid moisture evaporation and increase the risk of damage. If you have washed your hair recently, dry it thoroughly before styling, including the areas underneath and near the roots. Hair should not feel cool or damp when you separate it into sections.
Next, gently detangle your hair with a suitable brush or comb. Work through knots before using the wand rather than pulling a heated tool through tangled sections. If your hair is naturally curly or textured, use a preparation method that suits your usual routine instead of brushing it aggressively, which can create unwanted frizz.
Heat protectant is another important part of preparation. Choose a product designed for heat styling and follow its application instructions. Spread it evenly through the areas that will contact the barrel, and allow any required drying time before styling. Heat protectant can help reduce damage, but it does not make hair immune to high temperatures.
Setting Up Your Hair for Better Results
Once your hair is dry and protected, divide it into sections. The number of sections depends on how much hair you have, but separating the upper and lower layers is a useful starting point. Secure the hair you are not styling with clips so it does not fall into the working section.
Smaller sections usually produce more defined curls because the heat reaches the hair more evenly. Larger sections can create a looser appearance, but they may curl unevenly if too much hair is wrapped around the barrel at once. If the outer strands curl while the inner strands remain nearly straight, reduce the size of your sections.
Think about the finished style before you begin. For a uniform look, wrap similar-sized sections around the barrel in a consistent direction. For relaxed, natural-looking waves, alternate the direction of some curls and leave a little space near the ends if that suits your desired finish.
You should also choose a heat setting that matches your hair’s needs. Fine, fragile, bleached, or chemically treated hair generally requires extra caution and a lower temperature. Coarser hair may need a different setting, but higher heat is not automatically the answer to curls that will not hold. Begin with the lowest effective setting and increase it only when necessary, following the tool manufacturer’s guidance.
How to Use a Curling Wand for Smooth, Defined Curls
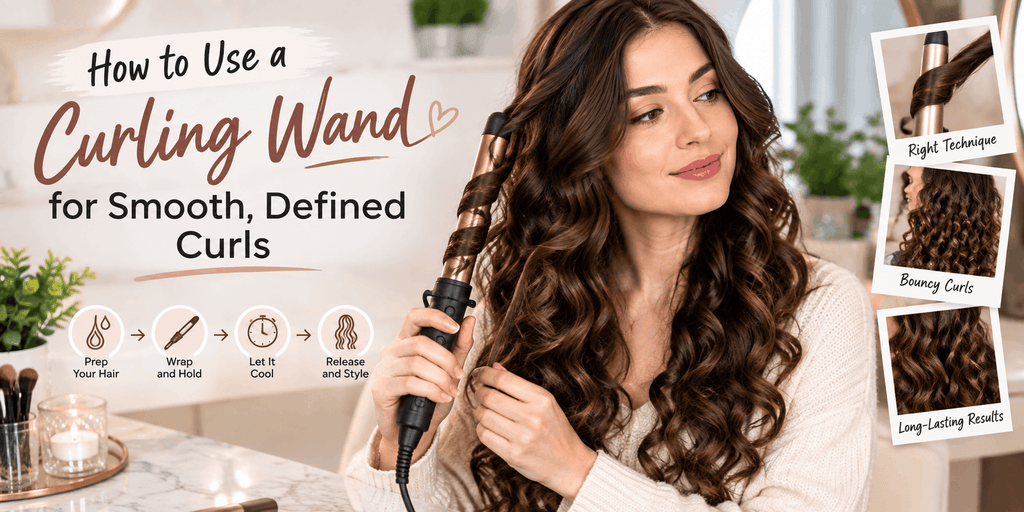
Using a curling wand becomes easier when you follow a consistent routine. Before starting, read the manufacturer’s instructions and use a heat-resistant glove if one is provided or recommended. Keep your fingers away from the hot barrel, and avoid allowing the tool to touch your scalp, ears, neck, or face.
Take one section of dry hair and hold the wand so the barrel points downward if that position feels comfortable and is suitable for your tool. Begin wrapping the section around the barrel, keeping the strands arranged neatly rather than piling them on top of one another. The hair should make contact with the heated surface without being pulled so tightly that you strain the roots.
Hold the section only for the time needed to form the curl, following the tool’s instructions and adjusting for your hair type. Longer exposure does not necessarily create a better result; excessive heat can make hair dry, brittle, and more prone to breakage. Carefully release the curl without pulling it down while it is still wrapped tightly around the barrel.
Allow each curl to cool before brushing or reshaping it. Hair is more likely to retain its new shape when it cools undisturbed. If you want more defined curls, leave the released sections alone until they are cool. If you prefer soft waves, gently separate them with your fingers afterward.
Getting an Even Finish From Roots to Ends
Consistency matters more than speed when you are learning to curl your hair. Try to keep your section sizes similar and use a similar wrapping method throughout each layer. This helps prevent one side from looking tightly curled while the other appears almost straight.
The area closest to the roots often needs a little more attention because it affects the overall volume of the hairstyle. However, avoid placing the hot barrel directly against your scalp. Leave a safe gap, and focus on creating a smooth curve through the upper portion of the section rather than trying to curl every strand from the very root.
Your ends may require a different approach. Wrapping them completely around the barrel can produce a more finished curl, while leaving the final portion out can create a relaxed, modern wave. If your ends are already dry or damaged, avoid repeated passes over them simply to make every curl look identical.
For a natural-looking result, pay attention to the direction of the curls around your face. Curling the front sections away from your face can open up the appearance of your hairstyle, while alternating directions elsewhere can add movement. These are styling choices rather than strict rules, so experiment with small changes to find what suits your features and hair length.
Why Your Curls May Fall Out Too Quickly
If your curls lose their shape soon after styling, the cause may be your preparation routine rather than the curling wand itself. Heavy conditioners, oily products, or thick styling creams can sometimes weigh down the hair, making it harder for curls to maintain their shape. Using lighter products before styling may help if your hair tends to become flat quickly.
Hair length and natural texture also play a role. Long hair can pull curls downward because of its weight, while very silky hair may need a different styling approach from naturally textured hair. In these cases, creating smaller curls and allowing them to cool completely can improve their staying power.
Another common mistake is touching or brushing the curls immediately after releasing them. Warm hair can lose its shape when it is pulled, stretched, or separated too soon. Let the curls cool before loosening them, then finish with a light styling product if needed.
Finally, resist the temptation to increase the temperature dramatically. If your curls do not hold, first review your section size, product use, cooling time, and technique. Protecting your hair should remain a priority even when you want a longer-lasting style.
Curling Wand Techniques for Different Hairstyles
The same curling wand can create several different looks, but the technique you use should match your hair length, natural texture, and preferred finish. Instead of following one wrapping method for every hairstyle, adjust the size of each section, the direction of the curl, and the way you finish the ends. Small changes can make a noticeable difference without requiring another styling tool.
Loose Waves With a Relaxed, Natural Finish
Loose waves are ideal when you want movement without making your hair look overly styled. A medium or larger barrel can help create this effect, depending on your hair length. Work with medium-sized sections and wrap them around the barrel without pulling the strands too tightly. Leaving the last inch or two of the ends unwrapped can create a more relaxed appearance.
For a natural finish, alternate the direction of the curls as you move around your head. This prevents every section from falling into the same pattern and gives the hairstyle more separation. Once your hair has cooled, gently loosen the waves with your fingers. Avoid brushing aggressively, particularly if your hair tends to become frizzy.
Loose waves can also work well on layered hair because the different lengths create movement around the face. If your hair is very long or heavy, the waves may soften naturally throughout the day. You can account for this by creating slightly more defined curls initially rather than using excessive heat.
Defined Curls With More Shape and Volume
If you prefer curls that stand out individually, use smaller sections and a barrel size suited to the curl pattern you want. Wrap each section neatly around the wand, making sure the hair is distributed evenly instead of overlapping in thick layers. Consistent wrapping helps the curls look more balanced.
After releasing each section, allow it to cool without immediately stretching it. If you want extra definition, you can gently support the curl in your hand while it cools, provided you can do so safely without touching the hot barrel. Once all the sections are cool, separate only the curls that need a little more movement.
Volume also depends on where the curls begin. Styling some sections away from the face and allowing the roots to retain their natural lift can make the finished look appear fuller. However, curls alone cannot permanently change your natural hair density, so focus on creating shape rather than expecting a wand to make thin hair genuinely thicker.
Styling Short Hair With a Curling Wand
Short hair can be curled successfully, but the working space is smaller. A narrow barrel may be easier to manoeuvre around a bob, lob, or shorter layered cut. Choose a tool with a comfortable handle and a barrel length that allows you to control each section without bringing the hot surface too close to your scalp or ears.
Use small sections and avoid wrapping hair too close to the roots. For a short bob, curling every section in exactly the same direction may produce a uniform, rounded shape. Alternating the direction can create more texture, while directing the front sections away from the face can help frame it.
If your hair is very short, check that a wand is suitable for your length before purchasing it. Some tools have long barrels that are more practical for longer hair, while others offer more control for shorter styles. Never try to force a short section around a barrel if doing so makes it difficult to maintain a safe distance from your skin.
Creating a Soft, Brushed-Out Look
A brushed-out finish combines the shape of curls with the softness of waves. Begin by creating consistent curls, then let them cool fully. Once they are cool, gently separate them with your fingers or use a suitable brush if your hair texture allows it. Start lightly and gradually loosen the shape rather than brushing through the entire hairstyle forcefully.
This approach can make tightly defined curls appear softer and can give medium-sized curls a fuller, more flowing appearance. A lightweight finishing product may help control flyaways, but using too much can make the hair look greasy or cause the curls to drop.
The key is to style for the final result rather than judging the hairstyle immediately after curling. Freshly released curls often look tighter than the finished look you have in mind. Allowing them to cool and then shaping them gently gives you more control over the final appearance.
Curling Wand Mistakes That Can Affect Your Hair
A curling wand can be useful for creating different hairstyles, but repeated heat styling may contribute to dryness, breakage, and changes in hair texture. Good technique involves not only getting the curls right but also avoiding habits that place unnecessary stress on your hair.
One common mistake is using the highest heat setting every time. A high temperature may seem like a shortcut, but it is not always necessary. Fine, bleached, fragile, or chemically treated hair may be particularly vulnerable to excessive heat. Start with a lower effective setting, follow the manufacturer’s instructions, and avoid repeatedly heating the same section to achieve a perfect curl.
Another mistake is curling damp hair. Hair should be completely dry before using a conventional curling wand unless the manufacturer specifically states that the tool is designed for another type of use. Applying intense heat to damp hair can cause damage, so make sure the inner layers are dry as well as the visible outer surface.
Using sections that are too thick can also lead to disappointing results. When too much hair is wrapped around the barrel, some strands may not receive even heat, leaving you with a curl that looks defined on the outside but loose inside. Smaller, manageable sections usually offer better control and may reduce the temptation to repeat the process.
Do not ignore your hair’s condition, either. If your ends are splitting or your strands feel unusually brittle, frequent curling may make the problem worse. Consider reducing heat-styling frequency, using non-heat styling methods on some days, and trimming damaged ends when appropriate.
Safe Habits for Everyday Styling
Before using a curling wand, place it on a stable, heat-resistant surface and keep the cord away from water. Do not leave the heated tool unattended, and switch it off and unplug it according to the manufacturer’s instructions when you finish. Allow it to cool completely before storing it.
Use a heat-resistant glove when recommended, particularly while learning how to wrap the hair. Keep your free hand away from the barrel and avoid styling too close to your scalp, ears, neck, or face. If your tool has a protective stand or other safety features, use them as instructed.
Clean the barrel only when the tool is switched off, unplugged, and completely cool. Product residue can accumulate over time, so follow the manufacturer’s cleaning instructions instead of scraping the surface or using cleaning products that may damage its coating.
If you notice an unusual smell, visible damage to the cord, inconsistent heating, or other signs that the tool may be faulty, stop using it until the issue has been addressed. A curling wand should never be used as a substitute for proper hair care, and no heat protectant can eliminate every risk associated with heat exposure.
How to Choose a Curling Wand for Your Hair
The right curling wand is not necessarily the most expensive or the one with the most settings. A suitable tool should match your hair length, styling habits, and desired curl pattern while offering dependable temperature control and comfortable handling.
Barrel size is a sensible place to start. If you usually wear loose waves, look for a size that can create that shape on your hair length. If you prefer more defined curls, consider a narrower barrel. People who enjoy switching between several looks may find an interchangeable set useful, but a single well-chosen barrel can be enough for everyday styling.
Temperature control is another important feature. Adjustable heat settings allow you to avoid using more heat than necessary. Some tools also offer automatic shut-off, a heat-resistant stand, or a cool tip that helps you handle the wand more comfortably. These features can be useful, although you should still follow the instructions and maintain safe handling practices.
The barrel coating and overall build quality are also worth considering. Ceramic-coated barrels are commonly marketed for smooth styling, while other materials and coatings have different heat-transfer characteristics. Product descriptions can help you compare features, but marketing claims should not be treated as guarantees that a tool will prevent damage.
Matching the Wand to Your Hair Type
Fine or delicate hair: Look for adjustable temperatures and a tool that can create a curl without requiring prolonged contact. Begin with a low setting and pay attention to how your hair responds. If it becomes dry or brittle, reduce heat styling.
Thick or coarse hair: A suitable barrel size and manageable sectioning can be more important than simply increasing the temperature. Consider a tool with reliable heat control and enough barrel length for your hair, and follow its recommended settings.
Naturally curly or textured hair: Decide whether you want to define certain sections, create a different wave pattern, or smooth selected areas. Prepare your hair according to its texture and use gentle detangling methods. Avoid repeated passes over already styled strands.
Long hair: A longer barrel may make it easier to wrap longer sections without stacking too much hair in one area. Check the usable barrel length before buying, especially if you prefer to curl most of your hair rather than just the ends.
Short hair: A narrower barrel and comfortable grip can offer better control. Make sure the design allows you to style around shorter layers safely without bringing the heated surface too close to your skin.
Is an Expensive Curling Wand Worth It?
Price alone does not determine whether a curling wand will work well for you. A more expensive tool may offer useful features such as more precise temperature controls, interchangeable barrels, a longer cord, or a design that is easier to handle. Those advantages matter most when they solve a real problem in your routine.
If you curl your hair only occasionally, a straightforward model with dependable temperature settings and basic safety features may be sufficient. If you style frequently or switch between different curl patterns, investing in a versatile tool may make sense. Before purchasing, compare the warranty, instructions, barrel dimensions, heat settings, and availability of replacement parts rather than relying only on promotional claims.
Keeping Your Curls Looking Good After Styling
Once you have finished curling, allow the entire hairstyle to cool before making major adjustments. This gives the curls time to settle and helps you judge the actual shape. If you want a more relaxed finish, loosen the curls gradually rather than brushing them all out at once.
Choose finishing products according to your hair’s needs. A lightweight hairspray can help support the style, while a small amount of smoothing serum may help tame flyaways on suitable hair types. Avoid applying heavy products directly to the roots if your hair tends to become flat, and follow the product instructions to prevent buildup.
Humidity, wind, and repeated touching can affect how long your curls last. You cannot completely control the weather, but you can avoid continually running your fingers through your hair and use a finishing product that suits the conditions. If your hair naturally drops curls quickly, consider a softer wave pattern that still looks attractive as it relaxes.
Your nighttime routine can also make a difference. If your hair is long enough, loosely gathering it in a comfortable style or using a smooth pillowcase may reduce friction while you sleep. Avoid tying curls tightly, as tension can flatten the shape and stress the hair. The next morning, refresh the hairstyle gently rather than automatically applying heat to every section again.
Give your hair breaks from heated styling when possible. Heat-free braids, rollers, or other suitable methods can create movement without relying on a hot barrel. Regular conditioning and gentle handling support the overall appearance of your hair, although no single product can repair every form of heat damage.
Final Thoughts
A curling wand offers a flexible way to create everything from relaxed waves to more defined curls. The best results come from understanding how barrel size, sectioning, wrapping technique, and cooling time work together rather than relying on high temperatures or repeated passes.
Choose a tool that suits your hair, prepare your strands carefully, and make heat protection part of your routine. With practice, you can adapt your technique to different hairstyles while keeping your hair’s condition in mind. The goal is not simply to create curls that look good immediately, but to find a styling method that gives you the finish you want without putting unnecessary stress on your hair.
Daily use can increase cumulative heat exposure and the risk of dryness and breakage. How much damage occurs depends on your hair’s condition, the temperature, the duration of contact, and your technique. Using heat less often, selecting the lowest effective setting, and trying heat-free styles can help reduce unnecessary exposure.
Your hair does not necessarily need to be freshly washed, but it should be dry, detangled, and free from excessive product buildup. Heavy or oily products may weigh down the curls. Always apply styling products according to their instructions and make sure the hair is completely dry before using a conventional heated wand.
Uneven results can come from inconsistent section sizes, different wrapping directions, varying contact times, or a barrel that does not suit your hair length. Practising with manageable sections and following the same basic technique can improve consistency. You do not need every curl to be identical for the hairstyle to look natural.
One Comment