
Perfect eyebrows can completely transform your face, but achieving balanced, symmetrical brows isn’t just about tweezing random hairs. That’s where eyebrow mapping comes in. This professional technique helps determine the ideal brow shape based on your unique facial features, creating brows that enhance your natural beauty rather than overpower it.
Whether you’re shaping your brows at home, preparing for brow lamination, microblading, tinting, or simply trying to improve your everyday makeup routine, learning how to map your eyebrows correctly is one of the most valuable beauty skills you can master.
In this comprehensive guide, you’ll discover exactly what eyebrow mapping is, why it’s important, the tools you’ll need, and a simple step-by-step process used by professional brow artists to create flawless brows every time.
What’s Inside This Guide
- What Is Eyebrow Mapping?
- Why Eyebrow Mapping Matters
- Tools You’ll Need
- Step-by-Step Eyebrow Mapping Tutorial
- Common Eyebrow Mapping Mistakes
- Tips for Different Face Shapes
- What to Do After Mapping Your Brows
- Frequently Asked Questions
- Final Thoughts
- Related Articles
What Is Eyebrow Mapping?📐
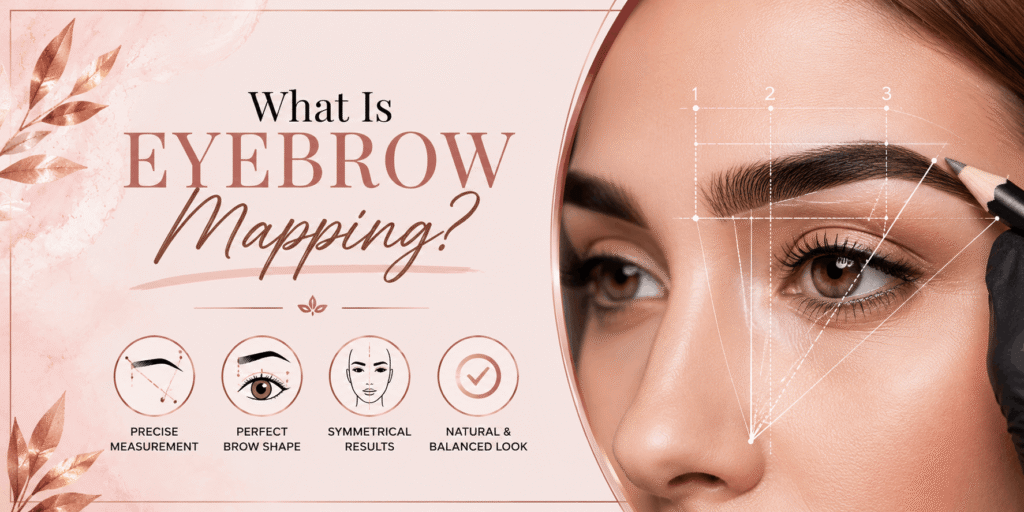
Eyebrow mapping is a professional technique used to measure and outline the most flattering eyebrow shape based on your facial proportions. Instead of guessing where your brows should begin, arch, and end, mapping uses precise facial reference points to create symmetry and balance.
Professional brow artists perform eyebrow mapping before treatments such as:
- Brow shaping
- Brow waxing
- Threading
- Brow tinting
- Brow lamination
- Microblading
- Ombre powder brows
- Permanent makeup
Since every face has different proportions, eyebrow mapping creates a customized shape instead of following one universal brow trend.
Why Eyebrow Mapping Matters✨
Many people accidentally overpluck their brows or create uneven arches because they shape each eyebrow individually. Eyebrow mapping eliminates the guesswork and provides a clear guide before any hairs are removed.
Proper eyebrow mapping can:
- Create balanced eyebrows
- Improve facial symmetry
- Prevent over-plucking
- Make your eyes appear larger
- Lift your overall facial appearance
- Enhance your natural features
- Produce more professional-looking results
- Make filling in brows much easier
Even a few millimeters can dramatically change how your eyebrows frame your face, which is why professionals rarely skip this step.
Essential Tools You’ll Need🖊️
One of the best things about eyebrow mapping is that it doesn’t require expensive equipment. Most of the necessary tools are affordable and easy to find.
You’ll need:
- Eyebrow mapping string
- White brow pencil
- Fine-tip brow pencil
- Spoolie brush
- Tweezers
- Small brow scissors
- Brow ruler (optional)
- Measuring calipers (optional)
- Magnifying mirror
- Good natural lighting
Having quality tools makes the process easier and significantly improves accuracy, especially if you’re mapping your brows for the first time.
Step-by-Step Eyebrow Mapping Tutorial📏
Professional brow mapping follows a sequence designed to create symmetrical, natural-looking eyebrows that complement your face.
Step 1: Find the Center of Your Face
Every brow map begins by locating your facial centerline.
Use mapping string or a ruler to create a straight vertical line through:
- The center of your forehead
- The bridge of your nose
- The center of your lips
- The middle of your chin
This line serves as your main reference point, ensuring both eyebrows remain balanced throughout the shaping process.
Step 2: Mark the Starting Point of Each Brow
Next, determine where each eyebrow should begin.
Hold a ruler or makeup brush vertically against the outer edge of your nostril. Where this imaginary line meets your brow bone marks the ideal starting point.
Lightly mark both sides with a brow pencil.
Starting your brows too close together can make your face appear crowded, while placing them too far apart may create a wider-looking nose.
Step 3: Mark the Brow Tail
Now identify where each eyebrow should end.
Angle your ruler from the side of your nostril toward the outer corner of your eye.
The point where this line reaches your eyebrow indicates the ideal tail.
Avoid extending the tail too far downward, as this can make your eyes appear tired or droopy.
Step 4: Locate the Highest Point of the Arch
The arch is what gives your eyebrows lift and personality.
Look straight into the mirror and hold the ruler from the side of your nostril through the outer edge of your iris.
Where this line intersects your brow is generally the highest point of the arch.
Soft arches create a youthful, natural appearance, while sharper arches provide a more dramatic effect.
Step 5: Determine Your Ideal Brow Thickness
Before removing any hairs, decide how thick you’d like your finished brows to be.
Consider factors such as:
- Natural brow density
- Face shape
- Hair color
- Personal style
- Age
- Current brow trends
Modern beauty trends often favor fuller brows, but the best shape is always one that complements your unique facial proportions.
Step 6: Draw the Lower Brow Guideline
Using your pencil, connect the starting point to the arch and continue toward the tail.
Keep this line smooth and follow your natural hair growth.
Avoid making the lower edge perfectly straight, as a subtle curve usually looks much more natural.
Step 7: Outline the Upper Brow
Now connect the top of the eyebrow.
Draw a gentle line from the brow head toward the highest point of the arch before tapering it naturally toward the tail.
The front of the brow should remain soft and lightly filled rather than square or blocky.
This creates a softer, more realistic appearance.
Step 8: Shape the Brow Tail
The tail should gradually become thinner while maintaining a smooth transition from the body of the eyebrow.
When refining the tail:
- Follow your natural hair direction
- Keep both tails symmetrical
- Avoid making them overly thin
- Maintain a gentle taper
A properly shaped tail helps lift the eyes and creates a polished finish.
Step 9: Compare Both Arches
Step back from the mirror and evaluate both eyebrows together instead of individually.
Remember the famous rule:
Eyebrows are sisters—not identical twins.
Minor differences are completely normal.
If one arch appears noticeably higher than the other, make only very small adjustments rather than removing too many hairs.
Step 10: Outline the Final Brow Shape
Once you’re satisfied with your mapping, trace the final outline clearly.
Everything outside this outline can then be removed carefully using:
- Tweezers
- Wax
- Threading
- Brow razor (if preferred)
Always work slowly and remove only a few hairs at a time. It’s much easier to remove additional hairs later than it is to fix over-plucked brows.
Eyebrow Mapping Tips for Different Face Shapes🪄
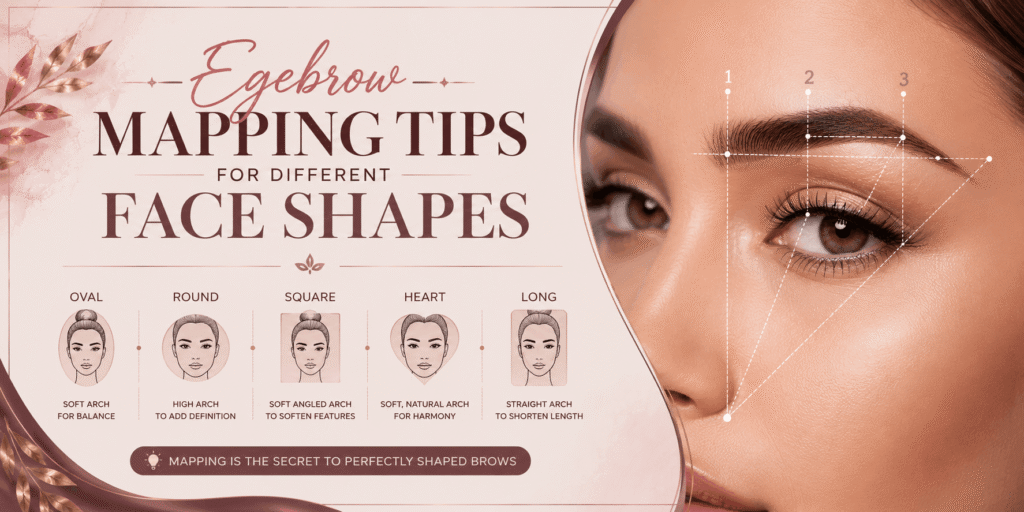
Although eyebrow mapping is personalized for every individual, understanding your face shape can help you choose a brow style that enhances your natural features.
Round Face
A slightly higher arch adds definition and creates the illusion of a longer, slimmer face.
Best features:
- Medium to high arch
- Slightly longer tail
- Defined but natural shape
Avoid overly rounded brows, as they can make the face appear even rounder.
Oval Face
Oval faces are considered the most versatile and suit almost every eyebrow shape.
Best features:
- Soft natural arch
- Medium thickness
- Balanced proportions
The goal is to enhance your natural symmetry rather than dramatically changing your brow shape.
Square Face
A square jawline benefits from softer brows that balance strong facial angles.
Best features:
- Rounded arch
- Fuller brow body
- Soft transitions
Avoid extremely flat brows, which can make the face appear boxier.
Heart-Shaped Face
People with heart-shaped faces typically have a wider forehead and narrower chin.
Best features:
- Gentle arch
- Soft rounded shape
- Medium-length tail
These features help create better facial balance.
Long Face
Flatter brows can visually shorten the appearance of a long face.
Best features:
- Low arch
- Longer horizontal shape
- Fuller body
Very high arches may make the face appear even longer.
Common Eyebrow Mapping Mistakes to Avoid⚠️
Even with proper measurements, beginners often make mistakes that affect the final result.
Try to avoid:
- Skipping the measuring process
- Over-plucking outside the guide
- Making the brows too thin
- Creating arches that are too high
- Extending the brow tail too far
- Ignoring your natural brow growth
- Rushing through the mapping process
- Making both brows perfectly identical
Taking your time usually produces much cleaner, more symmetrical brows.
What to Do After Mapping Your Brows❓
Once your eyebrows are fully mapped, you can move on to your preferred brow treatment.
Popular options include:
- Tweezing stray hairs
- Waxing
- Threading
- Brow tinting
- Brow lamination
- Filling sparse areas with a brow pencil
- Applying brow powder
- Preparing for microblading or ombré brows
After shaping, brush your brows upward using a spoolie and finish with a brow gel to keep every hair neatly in place throughout the day.
Final Thoughts
Eyebrow mapping is one of the simplest yet most effective techniques for creating beautifully balanced brows. Instead of relying on guesswork, it uses your natural facial proportions to determine where your eyebrows should begin, arch, and end, resulting in a shape that complements your unique features.
Whether you’re maintaining your brows at home or preparing for treatments like brow tinting, brow lamination, waxing, threading, or microblading, taking a few extra minutes to map your brows can make a noticeable difference. With the right tools, careful measurements, and a little practice, you’ll be able to achieve professional-looking eyebrows that frame your face beautifully and enhance your overall appearance



2 Comments